You have no items in your shopping cart.
Liquid Culture for Magic Mushrooms — The Complete Beginner's Guide
Posted under: Growing & Cultivation
Growing & Cultivation · 10 min read
Liquid culture magic mushrooms cultivation is currently the most discussed technique on r/unclebens and the Shroomery — and for good reason. A liquid culture (LC) is simply live mycelium suspended in a nutrient solution, and it lets you skip the slowest, riskiest part of the growing process: spore germination.
In this guide you will learn exactly what liquid culture is, why experienced growers prefer it over spore syringes, how to make your own from scratch, and how to use it to inoculate grain jars. Whether you start from a ready-made LC syringe or build your own medium, this method will speed up your grows and cut contamination risk significantly.
What Is Liquid Culture? The Concept Explained
A liquid culture is a nutrient-rich broth — typically honey water or light malt extract (LME) dissolved in distilled water — that contains actively growing mycelium. In contrast to a spore syringe, which holds dormant spores that still need to germinate, a liquid culture holds living fungal tissue that colonises substrate immediately on contact.
Think of it as the difference between planting a seed and transplanting a young plant. Furthermore, because the mycelium is already isolated and actively growing, liquid culture magic mushrooms cultivation produces faster, more uniform results every time. Most experienced growers describe the shift from spore syringes to LC as one of the biggest upgrades they ever made.
Liquid Culture vs. Spore Syringe — Why LC Wins for Most Growers
| Colonisation speed | LC: 5–14 days to visible grain colonisation — spore syringes often take 14–30+ days |
| Contamination risk | LC is lower risk — active mycelium out-competes contaminants faster than germinating spores |
| Visual check | With LC you can see the mycelium before inoculating — no guessing whether spores are viable |
| Volume needed | Only 1–3 ml of LC per grain jar — one 10 ml syringe inoculates 5–10 jars |
| Genetic consistency | LC is a clone — every jar gets the same genetics; spores introduce variability |
| Shelf life | Spore syringes: up to 12–24 months refrigerated — LC: up to 2 months refrigerated |
| Best for | LC for reliable yield and speed — spore syringe for genetic exploration and longer storage |
As a result, liquid culture magic mushrooms work is now the standard recommendation on Shroomery and r/unclebens for growers who want consistent, fast results. Spore syringes remain valuable for exploring new strains — and you can always convert a spore vial into LC using our Liquid Culture Growth Medium.
Option 1: Start With a Ready-Made Liquid Culture Syringe
The easiest entry point into liquid culture magic mushrooms growing is a pre-made LC syringe. Our syringes contain 10 ml of sterile, nutrient-rich liquid culture with pre-colonised mycelium of a specific strain, produced in a cleanroom environment. You receive living mycelium — zero germination time required.
Alternatively, browse the full liquid culture syringes collection to choose your strain. Store the syringe in the fridge (2–8°C) and use it within 2 months for best results. Bring it to room temperature for 30 minutes before use.
Option 2: Make Your Own Liquid Culture from Scratch
Making your own LC is straightforward and costs almost nothing per batch. Moreover, it lets you expand a single spore vial or existing LC syringe into unlimited inoculation volume. You need two things: a nutrient source and a sterile jar with a modified lid.
What you need
| Item | Notes |
|---|---|
| Liquid Culture Growth Medium vial (5, 10 or 50 ml) — or make your own nutrient solution (see recipes below) | Pre-sterilised vial, ready to inoculate with spores immediately — the simplest option |
| Spore vial or existing LC syringe | Use a spore vial, not a spore syringe — syringe solutions may be incompatible with LC medium |
| Sterile 10 ml syringe & needle (18G) | For transferring LC to grain jars; 18G works for most strains |
| Alcohol swabs | Wipe injection ports and needle before every inoculation |
| Pressure cooker (if making your own medium) | Must reach 15 PSI — needed to fully sterilise your nutrient solution |
| 250–500 ml glass jar with modified lid | Drill two holes: one for a self-healing injection port (silicone), one for gas exchange (polyfill) |
| Still air box or laminar flow hood | Work area for inoculation — still air box is the budget-friendly option |
Recipe 1: Honey Water LC (easiest)
Honey water is the go-to first LC recipe because you almost certainly have the ingredient at home already. Furthermore, raw honey contains natural antimicrobial compounds that give your culture a small extra margin against bacteria.
1Dissolve 10 g of raw or standard honey in 250 ml of distilled water. Stir until fully dissolved.
2Pour into your modified jar to two-thirds full. Leave headspace to prevent overflow during pressure cooking.
3Finger-tighten the lid (not fully locked) and pressure cook at 15 PSI for 20–30 minutes.
4Allow the pressure cooker to depressurise naturally. Then let the jar cool completely to room temperature before touching it.
Keep the concentration at 4% (10 g per 250 ml). A richer solution encourages bacterial growth more than it speeds up mycelium. More honey is not better.
Recipe 2: Light Malt Extract (LME) LC (faster colonisation)
LME delivers more diverse sugars and amino acids than honey, which generally produces faster, denser mycelium growth. Consequently, most experienced growers switch to LME once they have the process down.
1Dissolve 10 g of Light Malt Extract powder in 500 ml of distilled water. Stir thoroughly.
2Pour into your modified jar to two-thirds full and finger-tighten the lid.
3Pressure cook at 15 PSI for 20–30 minutes. Depressurise naturally and cool fully.
Alternatively, use our pre-sterilised Liquid Culture Growth Medium (available in 5 ml, 10 ml, and 50 ml vials) and skip the pressure cooker entirely — simply inject 1 ml of spore solution and shake daily.
How to Inoculate Your Liquid Culture
Once your jar cools to room temperature, it is ready to inoculate. Speed and cleanliness are the two factors that determine success at this stage.
1Move into your still air box or flow hood. Flame-sterilise your needle until it glows red, then let it cool for 10–15 seconds.
2Wipe the injection port with an alcohol swab. Insert the needle and inject 1–3 ml of spore solution or existing LC into the jar.
3Swirl the jar gently to distribute the inoculum. Tighten the lid fully.
4Place the jar in a dark location at 21–24°C. Swirl gently every day or two to prevent clumping.
5Within 5–14 days, white, fluffy mycelium strands will appear and spread through the liquid.
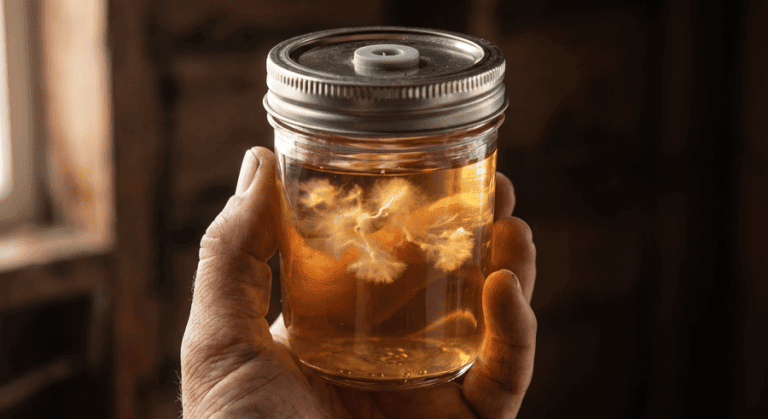
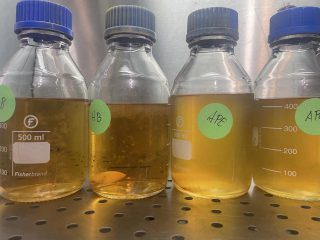
Contamination check before use: Healthy LC looks white-to-cream coloured and stringy. Green, black, or pink patches signal mould. A foul, sour, or cheese-like smell signals bacteria. Discard any jar that shows either of these signs — do not inoculate grain with a contaminated culture.
How to Use Liquid Culture to Inoculate Grain
This is where liquid culture magic mushrooms growing pays off. Because the mycelium is already active, grain jars inoculated with LC colonise dramatically faster than those inoculated with spores.
1Draw 1–3 ml of healthy LC into a sterile 10 ml syringe through the injection port.
2Work inside a still air box. Flame-sterilise the needle and let it cool.
3Wipe the grain jar’s injection port with alcohol and inject at 2–4 points around the jar to give mycelium multiple starting locations.
4Place the jar at 21–24°C in the dark. Expect visible colonisation within 5–7 days.
Once your grain jars reach 30–40% colonisation, give them a gentle shake to redistribute the mycelium and speed up the remaining colonisation. From there, spawn to bulk substrate as normal and proceed to your fruiting chamber. For a step-by-step overview of the full grow from inoculation to harvest, see our grow kit guide.
Ready to upgrade your grow? Browse our ready-made liquid culture syringes or grab a Liquid Culture Growth Medium vial to make your own.
Storing Your Liquid Culture
Store finished LC in the fridge at 2–8°C and use it within 2 months for best viability. Keep it away from direct light. Before every use, bring the syringe or jar to room temperature over 30 minutes — cold LC injected into a warm grain jar can cause condensation that raises contamination risk. Additionally, always shake or swirl the LC before drawing it into a syringe to distribute the mycelium evenly throughout the liquid.
Troubleshooting Liquid Culture Magic Mushrooms Problems
No visible mycelium after 14 days
First, check that your jar stayed at 21–24°C — temperatures below 18°C significantly slow germination. If conditions were correct, the spores may have been non-viable. Start a fresh batch with a new spore vial. Alternatively, consider switching to a pre-made LC syringe where viability is guaranteed.
Mycelium clumping at the bottom
This is normal in still jars. Swirl gently every day, or add a magnetic stir bar and place the jar on a low-speed stir plate. Even distribution of mycelium produces more consistent inoculations later.
Green or black patches
Green means Trichoderma or another mould — discard immediately. Black patches signal a different contaminant. In both cases, do not open the jar indoors without sealing it first. For more on identifying and preventing contamination in your grow, see our spore swab guide and laminar flow hood guide.
Cloudy liquid without visible strands
Slight cloudiness is normal in early-stage LC. However, uniform milky cloudiness combined with a sour smell indicates bacterial contamination — discard the jar. Healthy LC turns increasingly stringy and white rather than uniformly opaque.
Liquid Culture vs. Agar — Do You Need Both?
Liquid culture and agar plates serve different purposes and work best together. LC is fast and practical for inoculating large amounts of grain spawn. Agar, by contrast, lets you isolate individual mycelium strands, test for contamination, and select the strongest-looking sectors before expanding to LC. As a result, the most reliable workflow is: spores → agar → LC → grain → bulk substrate. That said, beginners can skip agar entirely and go spores → LC → grain with excellent results.
Quick Reference: Liquid Culture Magic Mushrooms at a Glance
| Best nutrient | Honey (4%) for beginners — LME (2%) for speed and density |
| Sterilisation | 15 PSI pressure cooker, 20–30 min — or use a pre-sterilised vial |
| Inoculation volume | 1–3 ml of LC per quart/litre grain jar |
| Colonisation time (grain) | 5–7 days with LC vs. 10–14 days with spores |
| Storage | 2–8°C fridge, up to 2 months — away from direct light |
| Healthy appearance | White-cream stringy strands, clear to light amber liquid, no smell |
| Contamination signs | Green/black/pink patches, uniform milky cloudiness, sour or foul smell |
| Skip the DIY? | Use a pre-made LC syringe or LC Growth Medium vial |
Further Reading on the Shroomery
The community discussion that kicked off the current liquid culture revival is freely available on the Shroomery. For an in-depth look at strain selection, advanced isolation, and the shift from Uncle Ben’s Tek to agar-first cultivation, nektar61’s updated 2025 grow guide on the Shroomery Mushroom Cultivation board remains the most cited community reference for beginner and intermediate growers.
April 25, 2026