You have no items in your shopping cart.
Sterilising Grain Jars at Home: Pressure Cooker vs Steam vs Oven
Posted under: Growing & Cultivation
Growing & Cultivation · 18 May 2026 · 9 min read
Sterilising grain jars is the single most important step in home cultivation. Moreover, it is the step new growers most often get wrong. Get it right, and your jars colonise into clean, snow-white mycelium within two to three weeks. However, get it wrong, and you will open the lid to green, pink, or grey contamination, no matter how good your spores were. In other words, the whole grow rests on this one afternoon of work.
This post is part of our broader cultivation series. We already covered the agar plate workflow. Furthermore, we also published our liquid culture beginner's guide. Now we look at the next link in the chain. Specifically, that means turning a kilo of dry grain into sterile, ready-to-inoculate spawn jars.
We compare the three methods most home growers actually use. Those are: pressure cooker, atmospheric steam, and oven. For each, we share honest pros, cons, and risk levels. By the end, you will know which one fits your kitchen, your budget, and your patience.
Why sterilising grain jars matters more than any other step
Grain is rich in starch, sugars, and protein. Specifically, that is exactly what your mycelium needs to colonise quickly. Furthermore, it is also exactly what every airborne mould spore wants. Therefore, if even one heat-resistant bacterial endospore survives in your jar, it will outpace the mycelium within days. As a result, growers who skip this step almost always lose their first three grows before they understand why.
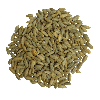
Importantly, "clean" is not the same as "sterile". For instance, boiling and rinsing reduce the load. However, they leave endospores intact. In fact, sterilisation means holding the jar contents at a high enough heat, for long enough, to kill those endospores. Indeed, the global standard is clear. The FAO mushroom cultivation manual calls for 121 °C for 90 minutes at 15 psi. Specifically, that is the same benchmark used in commercial labs.
For instance, a 2022 study published in Scientific Reports showed clear results. Specifically, grain substrates exposed to under-pressurised steaming kept viable bacterial colonies in nearly 40% of replicates. By contrast, a true pressure cycle dropped that figure to under 2%. Moreover, the difference grows wider with jar size. In short, bigger jars hold a cold core for longer, so partial methods fail more often.
This is why we treat sterilising grain jars not as a chore. Instead, we see it as the moment your grow actually begins. Specifically, the hour you spend here saves you four weeks of disappointment later.
Tip — preparation saves you twice. Hydrate your grain the night before. Simmer rye, millet, or wheat berries for 15 minutes, drain, and let them air-dry on a tray until the surface feels dry but the kernel is still firm. Furthermore, this "field-capacity" moisture content (roughly 50–55%) is the sweet spot for both sterilisation and colonisation. For the full hydration workflow see our broader guide on cultivation hygiene.
Three methods for sterilising grain jars at home
Now to the practical part. There are three realistic home methods, and they sit on a spectrum from "lab-grade reliable" to "you might get lucky". Below we map each one against time, cost, failure rate, and what kind of grower it suits. In short: not every method is equal, but each has its place.
| Method | Temperature / time | Typical failure rate | Equipment cost (EU) | Best for |
|---|---|---|---|---|
| Pressure cooker (15 psi) | 121 °C for 90 min | 2–5% | €60–€180 | Anyone serious about repeat grows |
| Atmospheric steam (PC tek without pressure) | 100 °C for 24 h (× 2 days) | 15–30% | €20–€40 | One-off grows, small jars, no PC available |
| Oven dry-heat | 160 °C for 2 h (grain only, no water) | 30–50% | €0 (most kitchens) | Sterilising dry tools and lids — not hydrated grain |
Method 1 — pressure cooker (the gold standard)
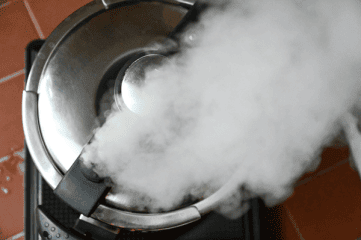
The pressure cooker is the only home method that reliably hits the FAO's benchmark. As a result, this is what every serious grower eventually buys. Specifically, you want a unit rated to 15 psi. Furthermore, the chamber must be tall enough to fit at least four quart-sized jars upright.
The process is simple. First, fill each jar two-thirds with hydrated grain. Next, hammer a small hole in the lid. Then, cover the hole with breathable tape or a self-healing port. After that, place the jars on a wire rack inside the cooker. Add 3 cm of water below. Finally, heat to full pressure and hold for 90 minutes. Afterwards, let the cooker cool down on its own. Importantly, never force-vent the lid. Otherwise, the pressure drops fast. Then, unsterile air gets sucked back into the jar through the filter.
Therefore, the rule of thumb is simple: when in doubt, longer is safer than shorter. However, do not go beyond 2 hours. Otherwise, you risk caramelising the grain sugars. As a result, the substrate becomes less hospitable for mycelium. Indeed, 90 minutes remains the sweet spot.
Method 2 — atmospheric steaming (PC tek without pressure)
If you do not own a pressure cooker, atmospheric steam is your backup. Specifically, you place the jars in a large stockpot with a few centimetres of water. Keep the lid on. Then, you steam them at boiling point (100 °C) for hours at a time. However, 100 °C does not kill the tough endospores in one go. Therefore, you must repeat the process on two days in a row. As a result, the surviving endospores wake up overnight in the warm jar. Consequently, the second session kills the now-vulnerable cells.
This method works, but it has trade-offs. Specifically, it doubles your time investment. Moreover, it still carries a 15–30% failure rate. For instance, our readers report it works well for small (≤ 500 ml) jars. However, it almost never works for larger 2 L bags. Unfortunately, atmospheric steam is also where most "my grow contaminated" complaints originate. Therefore, if you go this route, run smaller jars. Also, inoculate as soon as they cool.
Method 3 — oven dry-heat (limited use)
Oven sterilisation is widely misunderstood. Specifically, dry-heat at 160 °C for two hours sterilises tools, foil, and empty glass jars reliably. However, it does not sterilise hydrated grain. The reason is simple. Water inside the jar will boil long before the kernel core reaches sterilising temperature. As a result, heat stays uneven, and the failure rate climbs to 30–50%. Therefore, save the oven for prepping equipment. Never use it for the grain itself.
What to do after the cycle finishes
Patience is the final ingredient. Specifically, let jars cool inside the closed cooker for at least 8 hours. Ideally, leave them overnight. Otherwise, opening hot jars pulls room air across the warm filter. Unfortunately, warm air carries every kitchen spore with it. Moreover, room-temperature jars also protect your spore syringe or liquid culture. Indeed, they prevent heat shock during inoculation.
For your inoculation step, we always recommend a still-air box or a flow hood. Specifically, if you have access to one, see our guide on working under a laminar flow hood. Otherwise, a clean room works too. Close the windows. Avoid foot traffic. Wipe the work surface down. Together, these steps get you most of the way there.
Common mistakes when sterilising grain jars (and how to avoid them)
Even with the right equipment, small process errors cause most failures. Therefore, we collected the most common ones our community reports, so you can sidestep them on grow number one rather than grow number five.
1. Too much water in the grain. Specifically, if kernels look glossy or pool water in the bottom of the jar, you over-hydrated. As a result, wet grain compacts during sterilisation. Then, oxygen drops, and anaerobic bacteria thrive. Therefore, drain harder next time.
2. Lids that do not breathe. Specifically, solid metal lids without a filter trap pressure during cooling. As a result, a vacuum forms inside the jar. Then, it sucks unsterile air back in once the seal weakens. Therefore, always use a filter disc, micropore tape, or a synthetic patch.
3. Force-venting the pressure cooker. A fast pressure drop pulls room air through the filter. In short, let it cool naturally — patience saves grows.
4. Skipping the dry-down step. Wet outer kernels stick to the glass and create cold spots. Therefore, air-dry the surface even though the core remains hydrated.
5. Re-using contaminated jars without inspection. Specifically, if a jar grew anything coloured last cycle, deep-clean it twice. Furthermore, run a longer sterilisation. For a full taxonomy of contamination, see what contamination actually looks like. Indeed, recognising the colour saves you time the next time around.
Why this matters for your wider grow
Sterilising grain jars sits at the centre of every cultivation workflow we publish. Specifically, your spores, your liquid culture, your agar plates, and your bulk substrate all depend on this one step. As a result, growers who invest a good afternoon in this process report higher first-flush yields. Moreover, they see lower contamination rates. They also see faster total grow cycles.
Moreover, the European research community treats home cultivation as a serious topic. For instance, the Dutch non-profit OPEN Foundation publishes practical material on psilocybin research and harm-reduction. Furthermore, peer-reviewed studies like the one cited above give home growers a solid evidence base. Therefore, you can lean on data, not forum folklore.
In other words, sterilising grain jars is not a mystery. Instead, it is a kitchen procedure with a clear temperature target, a clear time target, and a clear failure mode. Therefore, once you internalise that, the rest of the grow becomes a series of much smaller decisions.
Pressure cooker safety. A pressure cooker is a sealed vessel running at high temperature for over 90 minutes. Therefore, never leave one unattended on the stove. Also, never tamper with the safety valve. Furthermore, never force the lid open while pressure remains. In addition, read the cooker's manual before its first cultivation use. Indeed, do this even if you have used the same model for cooking food. Specifically, burns and scalds from steam are by far the most common home cultivation injury.
Ready to start sterilising grain jars at home?
Prefer to skip the pressure cooker entirely? Our pre-sterilised spawn bag arrives ready to inoculate, so you can move straight to the agar or liquid culture step. Otherwise, the rye berries and glass jars below give you a full DIY spawn workflow in one order.
Get the gear for a clean spawn workflow
Organic Rye Berries | 1 kg Bulk Grain Substrate
 Organic European rye grain berries — the classic grain spawn substrate that b...
Glass Jar with Screw Cap
 High-quality glass jars with metal screw cap, available in 4 sizes (230 ml, 3...
Sterile Millet Spawn Bag | 2000 ml & 4000 ml Grain Spawn
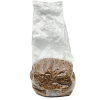 Pre-sterilised millet grain spawn bag with self-healing injection port. Millet is the commerci...
This article is for informational and educational purposes only. We share cultivation methodology so that readers can make informed, responsible decisions about what they grow at home. The reader is solely responsible for understanding and complying with the rules that apply to them in their own circumstances. Nothing in this post is medical or legal advice.
May 18, 2026