You have no items in your shopping cart.
Cloud920 Ready-to-Grow Bag Instructions — Step-by-Step Guide
Applies to all Cloud920 Ready-to-Grow bags — every strain, every size.
These Cloud920 grow bag instructions walk you through every step: from unboxing to harvest and beyond. Start growing as soon as possible after your bag arrives. If you need to wait, store it in the fridge at 2–8 °C for a maximum of two weeks. Keep the bag inside its box, in a clean fridge free of mould.
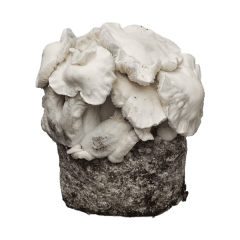
The white substance inside the bag is mycelium — the root-like network of the fungus. Your mushrooms grow directly from this network. Its fluffy, mould-like appearance is completely normal.
What's in Your Cloud920 Grow Bag Kit
| 1 × Cloud920 Grow Bag | 2 000 cc pre-colonised substrate with active mycelium. Integrated micron filters allow passive air exchange while keeping contaminants out. |
| 1 × Large Bag Clip | Seals the bag between ventilation sessions. Slide it off to one side when airing. |
| 1 × Rubber Band | Place around the outside of the bag at substrate height. This prevents side-pinning — mushrooms growing on the sides instead of on top. |
Before You Start — Cloud920 Grow Bag Instructions for Hygiene
Contamination risk is highest during the first opening. A clean workspace at setup prevents the vast majority of grow problems. Follow these steps before you touch the bag:
⚠️ Never skip hygiene. Even a quick hand-wash makes a real difference. Read more about why hygienic precautions matter when growing mushrooms.
How to Start Your Cloud920 Grow Bag — Step by Step
1
Place the rubber band
Place the rubber band
Slide the rubber band around the outside of the bag. Position it at the same height as the top of the substrate block. As a result, mushrooms will pin on the surface instead of down the sides.
2
Open the bag once
Open the bag once
In your clean, settled room, unroll the top and gently pull the sides apart. This single opening introduces fresh air, which triggers the pinning process. After a few seconds, close the bag with the clip.
? That's it for setup. No soaking, no water, no misting needed at this stage. The substrate already holds enough moisture for the first two flushes.
3
Place in the right spot
Place in the right spot
Put the bag on a clean, elevated surface such as a shelf or desk. The ideal growing temperature is 23 °C. Never go below 21 °C or above 27 °C. In addition, the bag needs indirect daylight so it can recognise the natural day-and-night cycle. Avoid direct sunlight and complete darkness.
⚠️ Do not place next to a radiator or other heat source. If your room stays below 21 °C, use a heat mat with a small object (e.g. a pencil) between the mat and bag to prevent hotspots.
4
Wait — then start daily ventilation
Wait — then start daily ventilation
During the first week, no action is needed. From day 10 onwards, ventilate once a day: slide off the clip, gently press the bag sides together to push out stale air, pull apart to let fresh air in, and close again. This takes less than 30 seconds. Stop daily ventilation once pins appear.
Cloud920 Grow Bag Instructions — Growing Conditions
| Condition | What to do |
|---|---|
| Temperature | 23 °C ideal — minimum 21 °C, maximum 27 °C at all times |
| Light | Indirect daylight with a natural day/night cycle. Never direct sunlight. |
| Humidity | No misting needed. Condensation inside the bag means humidity is fine. |
| Fresh air | Ventilate daily from day 10 until pins appear. Then pause until the next flush. |
| Water | No extra water for the first two flushes. Soak only after the second harvest. |
What to Expect Week by Week
| Timeline | What's happening |
|---|---|
| Week 1 | Nothing visible — the mycelium is consolidating beneath the surface. This is normal. No action needed. |
| Week 2 | Start daily ventilation. First signs of pinning may appear as small white dots on the surface. |
| Week 3–4 | Pins develop into full fruit bodies for most strains. The harvest window opens when the veil starts to break. |
| Week 3–5 (Jack Frost) | Jack Frost takes longer than other strains. No pins at week 3 is completely normal — stay patient. |
How to Harvest
Harvest when the veil beneath the caps starts to break — regardless of size. Do not wait until caps are fully open. Open caps release spores onto the substrate, which can reduce the next flush. Furthermore, potency decreases once the veil breaks. Read our full guide on when to harvest magic mushrooms for more detail.
1
Wash your hands
Wash your hands
Before harvesting, wash hands and forearms thoroughly. Ideally, wear gloves.
2
Roll down the bag
Roll down the bag
Unclip the bag and roll it down to fully expose the substrate. This gives you a clear view and easy access to all fruit bodies.
3
Twist and pull
Twist and pull
Grip each mushroom at the base. Twist gently until it almost releases, then pull. Remove the full mushroom including the base — leaving stem remnants behind increases contamination risk.
4
Harvest everything
Harvest everything
Pick every mushroom, even the smallest ones. Any unpicked fruit body left behind will rot on the substrate and can prevent the next flush from developing.
Getting More Flushes from Your Grow Bag
After the first harvest, close the bag with the clip and return it to its growing spot. Resume daily ventilation and wait for new pins — they usually appear within one to two weeks.
? After the second flush, soak to rehydrate. Fill the bag with clean tap water or spring water until the substrate block is fully submerged. Let it soak for 12–24 hours, then drain completely. Resume the grow cycle. Never use distilled or demineralised water.
Most Cloud920 bags produce three to five flushes. Later flushes are typically smaller. When no new pins appear within four weeks after the last harvest, the substrate is exhausted.
Strain-Specific Notes
Not every strain behaves the same way. The table below highlights the most important differences. Consequently, you can adjust your expectations and care routine per strain.
| Strain | What to know |
|---|---|
| Jack Frost | First pins typically appear between week 3 and week 5. This is normal — not a sign of failure. Stay patient. |
| Yellow Umbo | Needs more fresh air than other strains. Start daily ventilation from day 7, not day 10. |
Troubleshooting Your Cloud920 Grow Bag
| What you see | What it means |
|---|---|
| No pins after 2 weeks | Normal for most strains. Start daily ventilation and wait. Most strains pin in week 2–4. |
| No pins after 5 weeks | Jack Frost: still normal. Other strains: check your temperature. Below 21 °C slows or stops growth entirely. |
| Blue bruising on mushrooms | Completely normal. This is psilocybin oxidising — not contamination. |
| White fuzzy growth | Likely healthy mycelium. However, green, black, pink, or red growth means contamination — discard the bag immediately. |
| Water pooling on substrate | Open the bag, carefully pour out excess water, close and continue as normal. |
| No condensation visible | After flush 2, the substrate may need rehydration. Soak for 12–24 hours as described above. |
| Thin, leggy pins | Not enough fresh air. Increase to twice-daily ventilation until the pins thicken. |
| Mushrooms aborting early | Usually caused by dryness or temperature fluctuation. Stabilise both before the next flush. |
⛔ When in doubt about discolouration, take a photo and contact our support team. Blue = normal. Any colour other than white, cream, or blue could indicate contamination.
Quick Reference
| Hygiene | Disinfect hands, arms, and workspace before every interaction with the bag. |
| Temperature | 23 °C ideal — never below 21 °C, never above 27 °C. |
| Fresh air | Ventilate daily from day 10 until pins appear. Yellow Umbo: daily from day 7. |
| Humidity | No misting. Condensation inside = humidity is fine. Soak only after flush 2. |
| Light | Indirect daylight only. Never direct sunlight. |
| Harvest | When the veil beneath the cap starts to break — before caps open fully. |
Looking for more strains? Browse all Cloud920 Ready-to-Grow Bags.
Questions? Contact our support team or send a photo for a personal assessment.