You have no items in your shopping cart.
Cloud920 Classic XL Growkit Instructions
Applies to all Cloud920® Classic growkits — Albino Golden Teacher, B+ and McKennaii.
Start growing immediately after receiving your Cloud920® Classic growkit. If you need to wait, store the kit in the refrigerator at 2–7°C for up to 14 days. Keep it inside the cardboard box in a clean, mould-free fridge.
The white substance inside the grow box is mycelium — the root-like network of the fungus. Mushrooms grow from this network. Its mould-like appearance is completely normal.
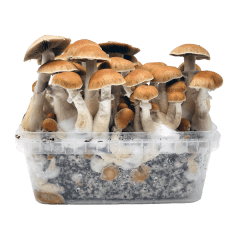
What's in the box
| 1x Grow box | Contains nutrient-rich substrate with active, living mycelium — ready to fruit. |
| 1x Grow bag | Transparent bag with a white gas-exchange filter patch. Creates the ideal microclimate for your mushrooms. |
| 2x Paper clips | Used to secure the grow bag after folding. Keep the fold tight to maintain humidity. |
What you need
The Cloud920® Classic growkit does not include printed instructions or supplies. Make sure you have the following ready before you begin:
⚠️ Never use distilled or demineralised water. These lack the minerals that support healthy mushroom growth. Use clean tap water or store-bought mineral water only.
How to set up your Cloud920® Classic growkit
1
Prepare your workspace
Prepare your workspace
Clean your work surface with disinfecting alcohol. Wash your hands and forearms thoroughly, then put on sterile gloves.
2
Place the grow box in the grow bag
Place the grow box in the grow bag
Take the grow box out of the cardboard box and place it inside the grow bag. Remove the lid from the grow box and save it for later use (you will need it for soaking after flush 2).
3
Mist lightly
Mist lightly
Use the spray bottle to apply two light mists against the inside walls of the grow bag. Do not spray directly onto the substrate.
⚠️ Be gentle with misting. Too much water will prevent mushrooms from growing. Two light mists is enough at this stage.
4
Close the bag
Close the bag
Fold the opening of the grow bag inward twice (about 2 cm per fold). Make sure you do not fold over the white filter patch — this must remain uncovered for gas exchange. Secure the folds with the two paper clips.
5
Place in the right spot
Place in the right spot
Put the kit on an elevated surface — a table, shelf or top of a cupboard. The ideal temperature is 22–24°C, never below 21°C or above 27°C. The kit needs indirect daylight to recognise the day-and-night cycle. Avoid direct sunlight and complete darkness.
6
Leave undisturbed for 3 days
Leave undisturbed for 3 days
Do not open or move the kit for the first three days. The mycelium needs this time to consolidate and begin preparing for fruiting.
Fresh air exchange and misting
Starting from day 4, perform fresh air exchange (FAE) once every day. Follow these steps:
1
Settle the air
Settle the air
Close all windows and doors in the room. Wait 30 minutes to let airborne particles settle before opening the grow bag.
2
Open the bag
Open the bag
Remove the paper clips and unfold the bag opening.
3
Check condensation
Check condensation
Look at the inside of the grow bag. If you see clear condensation droplets, humidity is fine — no additional misting needed. If there is little or no condensation, apply two light mists against the inside walls of the bag.
4
Refresh the air
Refresh the air
Gently press the sides of the grow bag together to push out the old air, then pull them apart to draw in fresh air. Repeat this about four times.
5
Close the bag
Close the bag
Fold and clip the bag the same way as during setup.
Repeat daily until the first pins appear. Once you see pins, stop misting completely but continue the daily fresh air exchange.
Growing conditions at a glance
| Condition | What to do |
|---|---|
| Temperature | 22–24°C ideal — min 21°C, max 27°C at all times |
| Light | Indirect daylight — natural day/night cycle. Never direct sunlight. |
| Humidity | Maintain condensation inside the grow bag. Mist lightly only when condensation disappears. |
| Fresh air | Daily from day 4 onwards. Continue through harvest and between flushes. |
| Misting | Two light mists during setup and during FAE if no condensation is visible. Stop misting once pins appear. |
What to expect week by week
| Timeline | What's happening |
|---|---|
| Days 1–3 | Leave undisturbed. The mycelium is consolidating. No action needed. |
| Days 4–14 | Daily fresh air exchange begins. First pins (small white bumps) typically appear within 2–3 weeks. |
| Week 3–4 | Pins develop into full mushrooms. Once pins appear, they are usually ready for harvest within about one week. |
How to harvest your Cloud920® Classic growkit
Harvest when the veil beneath the caps breaks — ideally before the caps fully open. After the veil breaks, mushrooms gain water weight rather than potency. Fully open caps also release spores and tend to become hollow inside after drying.
1
Disinfect
Disinfect
Clean your work surface with disinfecting alcohol. Wash your hands and forearms thoroughly.
2
Remove the grow box
Remove the grow box
Take the grow box out of the grow bag and place it on your disinfected surface.
3
Pick all mushrooms
Pick all mushrooms
Harvest every mushroom, large and small. Grip each mushroom at the base, twist gently, and pull it out completely — stem, base and cap. Do not forget the mushrooms growing on the sides of the substrate.
⚠️ Pick everything. Unpicked mushrooms left behind will rot on the substrate and cause contamination that prevents the next flush.
Getting more flushes
Immediately after harvesting your first flush, mist heavily: 15–25 sprays directly onto the substrate surface. Place the grow box back in the grow bag, close it with the paper clips, and return the kit to its growing spot.
If you see a layer of water inside the grow box the next day, drain it. Then continue the daily fresh air exchange cycle and wait for the next pins to appear.
Repeat the cycle of fresh air exchange, harvesting and heavy misting until the kit is depleted. Most Cloud920® Classic kits produce multiple flushes.
Soaking after the second flush
After the second harvest, the substrate benefits from a full soak to rehydrate:
⚠️ Exception: If parts of the substrate crumble off during harvesting, this is a sign the kit needs soaking earlier — even after the first flush.
Strain-specific notes
| Strain | What to know |
|---|---|
| Albino Golden Teacher | A rare leucistic variant of the Golden Teacher. Produces white to cream-coloured fruit bodies. Stable grower with a standard timeline of 2–4 weeks to first pins. |
| B+ | One of the most reliable and forgiving strains — excellent for beginners. Typically produces large fruit bodies and generous flushes. First pins within 2–3 weeks. |
| McKennaii | Known for high potency. Follows the standard timeline of 2–3 weeks to first pins. Harvest promptly when the veil breaks to preserve potency. |
Troubleshooting
| What you see | What it means |
|---|---|
| No pins after 2 weeks | Normal. Continue daily fresh air exchange and be patient. Most strains pin within 2–4 weeks. |
| No pins after 4 weeks | Check temperature — below 21°C slows or stops growth. Ensure the filter patch is not blocked. Consider using a heat mat. |
| Blue bruising | Completely normal. This is psilocybin oxidising — not contamination. |
| Green, black, pink or red discolouration | This indicates contamination. Remove from other grow kits immediately, take photos and contact customer support. |
| No condensation inside the bag | Humidity is too low. Add two light mists during your next fresh air exchange session. |
| Pooling water inside the grow box | Too much moisture. Carefully drain the excess water and reduce misting. |
| Thin, leggy mushrooms | Not enough fresh air. Increase fresh air exchange to twice daily. |
| Substrate crumbles during harvest | The kit is dehydrated. Soak immediately instead of waiting until after flush 2. |
⚠️ Unsure about a discolouration? Take a photo and contact our customer service. Blue = normal. Any other colour than white, cream or blue = potential contamination.
Quick reference
| Hygiene | Disinfect hands, forearms and work surface before every interaction with the kit. |
| Temperature | 22–24°C ideal — never below 21°C, never above 27°C. |
| Fresh air | Daily from day 4. Continue through harvest and between flushes. |
| Misting | Light misting only when no condensation is visible. Stop once pins appear. Heavy mist (15–25 sprays) after each harvest. |
| Light | Indirect daylight only. Never direct sunlight. |
| Harvest timing | When the veil beneath the cap starts to break — before caps open fully. |
| Soaking | After flush 2 (or earlier if substrate crumbles). Soak overnight, drain completely. |
Questions? Our team is happy to help. Browse all Cloud920® Classic growkits or contact customer service for a personal assessment.