You have no items in your shopping cart.
Cloud920 Copelandia Grow Kit Instructions
Applicable to all Cloud920 Copelandia Grow Kits.
Start cultivation as soon as possible for the best results. If you need to start later, store the kit in the fridge at 2-7 °C (14 days max).
Due to cold storage, the substrate may show blue or green spots on arrival. This is normal bruising, not contamination. If you are unsure, send a photo to our support team for verification.
What's in the box?
You will also need
Key success factors
Panaeolus cyanescens requires different care than Psilocybe cubensis. Keep these four rules in mind at all times:
Choose your growing location
Choose the right spot before you set up the kit. The location is crucial for success.
1
Find a clean, elevated spot
Find a clean, elevated spot
Place the kit on a clean, disinfected surface between knee and eye level, such as a shelf or the top of a cupboard. The kit needs indirect daylight - never direct sunlight.
Do NOT place the kit in:
Bathrooms, toilets, or basements (high contamination risk)
A box, container, or enclosed space (blocks fresh air circulation)
2
Check the temperature
Check the temperature
Panaeolus cyanescens needs warmth. Keep the temperature at 23-26 °C (73-79 °F). Never let it drop below 20 °C.
Tip: If your room is below 23 °C, use a heating mat designed for mushroom cultivation. Place it under the kit, never directly against the substrate.
Initial setup
3
Prepare yourself
Prepare yourself
Clean your work area thoroughly and wash your hands with soap. Wear gloves and a face mask if available. Work with your arms straight so the kit stays at arm's length - this prevents breathing or coughing into the kit.
4
Apply the casing layer
Apply the casing layer
Remove all contents from the box: substrate container, topsoil (casing layer) container, grow bag, and paperclip.
Spread the black topsoil evenly over the substrate surface. Smooth it to create a uniform layer.
5
Place the kit in the grow bag
Place the kit in the grow bag
Place the substrate container inside the grow bag. Mist potable water over the casing layer until it is damp to the touch but not saturated.
Squeeze the grow bag several times to fill it with fresh air, then close it with the paperclip.
Daily care: before pins form
Repeat this routine every morning and evening until you see the first small mushrooms (pins) appearing. This usually takes 5-17 days (typically 7-10 days at the right temperature).
6
Fresh air exchange and misting
Fresh air exchange and misting
Close doors and windows before opening the bag to avoid drafts. Always wash your hands or wear gloves before handling the kit.
Daily care: after pins form
Once you see small mushrooms (pins) forming on the surface, the routine changes. This is the most critical phase.
NEVER spray water directly on pins or mushrooms! Panaeolus cyanescens mushrooms do not tolerate getting wet and will stop growing if sprayed directly.
7
Adjusted routine (twice daily)
Adjusted routine (twice daily)
Continue this routine twice daily. Most mushrooms will be fully grown 5-7 days after pinning.
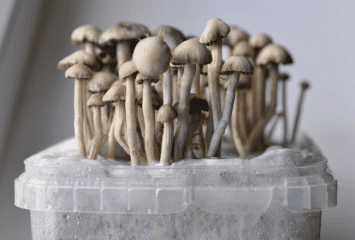
Harvesting
8
When to harvest
When to harvest
Harvest 24-36 hours after the mushrooms have shed their spores. Look for these signs:
9
How to harvest
How to harvest
Storage: Fresh mushrooms can be refrigerated for up to 7 days. For long-term storage, dry them completely using a food dehydrator or fan-dry method.
Preparing for the next flush
10
Rehydrate and restart
Rehydrate and restart
After harvesting all mushrooms:
Troubleshooting
No pins after 17 days
Mushrooms stopped growing
Green or black mold appears
Quick reference
| Hygiene | Wash hands, wear gloves and mask before every interaction. |
| Temperature | 23-26 °C. Never below 20 °C. |
| Fresh air | Squeeze the bag 3-4 times, twice daily. |
| Humidity | Before pins: Mist casing layer and bag walls. After pins: Mist only the inside of the bag. Never spray mushrooms directly. |
| Light | Indirect daylight. Avoid direct sunlight at all times. |
Good luck and happy growing!