You have no items in your shopping cart.
PF Tek Instructions: How to Grow Magic Mushrooms with PF Tek Cakes
Posted under: Growing & Cultivation

The Complete Step-by-Step PF Tek Guide for Growing Magic Mushrooms at Home (2026 Update)
PF Tek is one of the most reliable and beginner-friendly methods for growing magic mushrooms from scratch. Developed in the early 1990s by Robert "Psylocybe Fanaticus" McPherson, the technique uses small glass jars filled with brown rice flour and vermiculite as a substrate. If you have never cultivated mushrooms before, PF Tek magic mushrooms are an excellent starting point — the process is straightforward, the materials are affordable, and the results are consistent when you follow each step carefully.
In this guide: Everything you need to grow PF Tek magic mushrooms from inoculation to harvest — substrate preparation, sterilization, inoculation, incubation, and fruiting, all in one place.
You will also find a full supplies list with links to the products you need, plus tips on what to do after the first flush.
| Method | PF Tek (Brown Rice Flour + Vermiculite) |
| Difficulty | Beginner-friendly |
| Substrate containers | Half-pint (240 ml) glass jars with screw caps |
| Inoculant | Spore syringe |
| Colonisation time | 2–4 weeks at 26–28 °C |
| Fruiting conditions | 22–25 °C, high humidity, indirect light |
What Is PF Tek?
PF Tek stands for "Psylocybe Fanaticus Technique." It is a cultivation method that uses a mix of brown rice flour (BRF) and vermiculite as the growing substrate, packed into small glass jars. Once sterilised and cooled, each jar is injected with spores from a spore syringe. The spores germinate and the mycelium — the white, thread-like network of the fungus — colonises the substrate over two to four weeks.
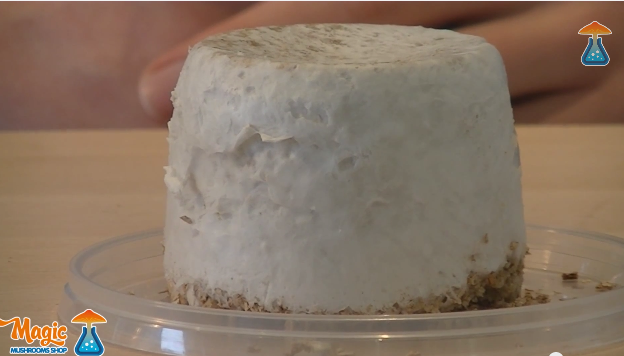
When a jar is fully colonised, the solid block of substrate is removed. These blocks are called cakes. The cakes are then transferred to a fruiting chamber where the right humidity and fresh air trigger mushroom growth.
Compared to bulk methods that use large tubs of grain or straw, PF Tek keeps things small and controlled. This makes it easier to manage contamination and to learn the fundamentals of mushroom cultivation. It is the most widely taught starting method in the global growing community, and for good reason.
What You Need: Full Supplies List
Before you begin, gather all your supplies. Having everything ready before you start reduces the risk of contamination and keeps the process smooth.
| Item | Notes |
|---|---|
| Vermiculite (Grade 3) | Fine-grade horticultural vermiculite. Acts as the base of the substrate and provides aeration and moisture retention. |
| Brown Rice Flour (BRF) | The main nutrient source for the mycelium. Use fine-milled brown rice flour — not white rice flour. |
| Glass Jars with Screw Caps | Half-pint (240 ml) wide-mouth mason jars. Metal lids are required — they tolerate pressure cooking. |
| Spore Syringe | Contains spores suspended in sterile water. Choose a Psilocybe cubensis strain suited to beginners. |
| Pressure cooker | For sterilising jars. A standard 6–8 litre pressure cooker works well. |
| 70% isopropyl alcohol | For disinfecting surfaces, hands, and needles before inoculation. |
| Micropore tape or polyfill | Used to cover injection holes in the jar lids to allow gas exchange while keeping contaminants out. |
| Mixing bowl and measuring cups | For preparing the substrate mix. |
| Fruiting chamber (shotgun terrarium) | A clear plastic storage container with holes drilled in the sides for airflow. Lined with moist perlite. |
| Perlite | Placed at the bottom of the fruiting chamber to maintain humidity through evaporation. |
| Spray bottle | For misting the chamber walls to maintain humidity. Do not mist directly onto cakes. |
Tip: Prepare your injection ports before sterilising the jars. Drill or punch four small holes (around 5 mm) through the metal lid, then cover each hole with micropore tape on the outside. This way the holes are already sealed when the jars come out of the pressure cooker.
Preparing the Substrate
The BRF/Vermiculite Recipe
The standard PF Tek substrate ratio uses two parts dry vermiculite to one part brown rice flour to one part water. For a half-pint jar, the typical amounts are:
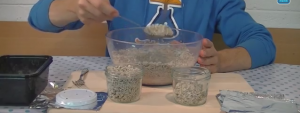
First, measure the vermiculite into a bowl. Add the water gradually and mix until all the vermiculite is moist but not dripping. Then add the brown rice flour and mix until evenly combined. The mixture should clump slightly when squeezed but release no liquid — if water drips out, add a little more dry vermiculite.
Filling the Jars
Fill each jar with the substrate mix, leaving the top 1–1.5 cm empty. This gap is important. After filling, add a thin layer of dry vermiculite to fill that top gap. The dry layer acts as a contamination barrier between the inoculation holes and the moist substrate below.
Do not pack the substrate down tightly. Leave it loose so the mycelium can colonise it efficiently.
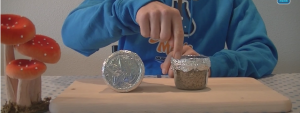
Screw the lids on firmly. Make sure the micropore tape covers all four injection holes. Then cover the entire lid with a layer of aluminium foil to keep moisture from collecting inside the holes during sterilisation.
Sterilisation
Sterilisation is the most critical step in PF Tek magic mushroom cultivation. Any bacteria or mould spores left alive in the substrate will compete with — and often outcompete — your mushroom mycelium. A pressure cooker is the only reliable way to achieve true sterilisation at home.
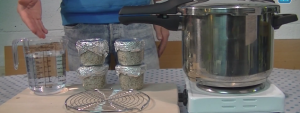
Place the filled jars upright in the pressure cooker. Add water to the bottom — enough to produce steam for the full cooking time without running dry. Do not let the jars sit directly in the water; place them on a rack or folded cloth.
Cook at 15 PSI (pounds per square inch) for 60 to 90 minutes. Once the cooking time is up, let the pressure drop naturally — do not force-release the steam. Allow the jars to cool completely to room temperature before inoculating. This takes several hours. Inoculating warm jars can kill spores and encourages condensation inside, which raises the risk of contamination.
For more detail on the sterilisation process, see our guide to sterilising cultivation materials and our guide on how to use a pressure cooker for mushroom substrate.
Important: Never skip sterilisation or substitute it with boiling water. Boiling reaches only 100 °C and does not kill heat-resistant bacterial endospores. Only pressure cooking at 121 °C provides true sterilisation.
Inoculation
Inoculation is the process of introducing spores into the sterilised substrate. This step requires a clean environment. Contaminants are everywhere in the air, on surfaces, and on your skin, so reducing their numbers is essential.
Preparing Your Space
Choose a room with as little air movement as possible. Turn off fans and air conditioning. Wipe down all surfaces with isopropyl alcohol. Wash your hands thoroughly, then put on nitrile gloves and spray them with alcohol as well. Some growers use a still air box — a large clear plastic tub with arm holes cut in the sides — to create a more controlled environment.
Using the Spore Syringe
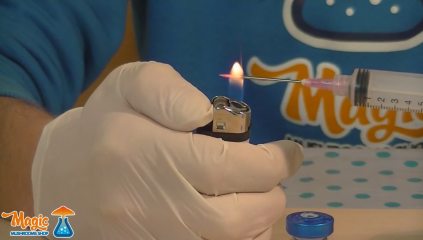
Shake the spore syringe vigorously for 30 seconds to distribute the spores evenly. Hold the needle over a flame until it glows red, then allow it to cool for a few seconds before use. Wipe the needle with an alcohol swab.
Peel back the micropore tape from one injection hole. Insert the needle at a slight angle so the tip points toward the glass wall of the jar. Inject a small amount of spore solution — around 0.5 to 1 ml per hole. Point the needle at four different spots around the jar by using all four holes. Distributing inoculation points speeds up colonisation significantly.
Re-cover each hole with micropore tape immediately after injecting. Flame-sterilise the needle between jars.
For a detailed walkthrough of this step, see our guide to using a spore syringe.
Tip: Inoculate late in the evening when air movement in your home is at its lowest. This simple habit noticeably reduces contamination rates for many growers.
Incubation
After inoculation, place the jars in a warm, dark location. The ideal incubation temperature for PF Tek magic mushrooms is 26–28 °C. At this range, colonisation typically takes two to four weeks.
Do not disturb the jars unnecessarily. Check them visually every few days. Within a week you should start seeing white, fluffy mycelium growth spreading from the inoculation points.
A fully colonised jar looks completely white throughout. After full colonisation, give the jars an additional 7 days before opening. This period, sometimes called "consolidation," allows the mycelium to strengthen and reduces the risk of contamination when you transfer the cakes.
Signs of Contamination
Healthy mycelium is white or off-white and has a fluffy or ropy texture. If you see green, black, orange, or pink patches, the jar is contaminated. Remove contaminated jars immediately from your growing area and dispose of them in a sealed bag outside. Do not open contaminated jars indoors — the spores of competing moulds, especially Trichoderma (green mould), will spread quickly.
Blue or bluish-green discolouration on PF Tek cakes is not always a sign of contamination. Mycelium bruises blue when physically disturbed, and this is a normal reaction. See our detailed guide on how to identify grow kit contamination for a clear breakdown of what is and is not a problem.
For guidance on temperature management during incubation and fruiting, see our article on the best temperature to grow magic mushrooms.
Fruiting the Cakes
Setting Up the Fruiting Chamber
A shotgun fruiting chamber (SGFC) is the standard setup for fruiting PF Tek cakes. Take a clear plastic storage container (around 50–60 litres) and drill holes every 5 cm across all six surfaces — four sides, the bottom, and the lid. Cover the holes on the inside with polyfill fibre to allow air exchange while filtering contaminants.
Add a 5–7 cm layer of perlite to the bottom of the chamber and wet it thoroughly. The perlite retains water and slowly releases it as vapour, keeping humidity high around the cakes.
Birthing and Preparing the Cakes
To "birth" a cake, simply invert the jar and tap the bottom gently until the substrate block slides out intact. The fully colonised cake should hold its shape and feel firm.
Before placing cakes in the fruiting chamber, many growers perform a dunk and roll:
Place each rolled cake on a small piece of aluminium foil on top of the perlite layer. The foil prevents the cakes from sitting directly in the wet perlite, which can cause bacterial issues on the base.
Fruiting Conditions
Magic mushrooms fruit best at 22–25 °C. Higher temperatures increase the risk of contamination and bacterial rot. Lower temperatures slow growth but are generally tolerable down to about 20 °C.
Mist the chamber walls (not the cakes directly) two to four times per day with clean water. Fan the chamber briefly after each misting to introduce fresh air and prevent CO₂ build-up. Elevated CO₂ leads to long, thin mushrooms with small caps — a sign that fresh air exchange (FAE) is insufficient.
Mushrooms need some light to orient their growth, but direct sunlight is harmful. Indirect natural light or a few hours of artificial light each day is sufficient. See our article on light requirements for magic mushrooms for more detail.
Pins — the first tiny mushroom primordia — typically appear within 5 to 14 days of setting up the fruiting chamber.
Harvesting Your Mushrooms
The right moment to harvest is just before or as the veil underneath the cap begins to tear. The veil is the thin membrane connecting the edge of the cap to the stem. Once it breaks and the cap flattens and opens fully, the mushroom has dropped spores. Harvesting just before this point gives the best quality.
To harvest, grip the mushroom at its base and twist gently while pulling upward. Avoid cutting — removing the whole stem reduces the risk of rotting stumps on the cake surface. For more guidance, read our dedicated article on how to pick magic mushrooms from your grow kit, and see when to harvest magic mushrooms for timing tips.
Tip: Harvest all mushrooms in a cluster at the same time, even small ones. Leaving stragglers on the cake often leads to aborts or rot that can spread contamination.
Dunk and Roll for a Second Flush
After the first flush, your cakes still contain mycelium and nutrients for additional harvests. A second — and sometimes third — flush is possible with a fresh dunk and roll cycle.
1
Remove spent mushroom bases
Remove spent mushroom bases
Pick off any remaining pins, aborts, or stump bases from the cake surface. Use clean, gloved hands or sterilised tweezers.
2
Dunk the cake
Dunk the cake
Submerge the cake in cold water for 12–24 hours. Use a clean bowl and change the water once if possible. The cold water also provides a mild temperature shock that helps trigger the next flush.
3
Roll in vermiculite
Roll in vermiculite
Drain the cake, then roll it in a fresh layer of dry vermiculite. Return it to the fruiting chamber and resume your misting and fanning routine.
4
Wait for the next flush
Wait for the next flush
Pins for the second flush typically appear within a week. Subsequent flushes are usually smaller than the first. Most cakes produce two or three flushes before the substrate is exhausted or contamination sets in.
Once a cake shows green, black, or other discolouration that is clearly mould and not mycelial bruising, dispose of it promptly. This protects the rest of your cakes from cross-contamination.
Common Problems and How to Fix Them
No pins after two weeks
If your cakes are fully colonised but no pins appear, the fruiting conditions may need adjustment. Check that the temperature is not too high or too low, and that you are fanning the chamber regularly. Sometimes a fresh dunk and roll — even on cakes that have not yet produced — is enough to trigger pinning. Also ensure the chamber receives at least some indirect light each day.
Green or black patches on the cake
This is most commonly Trichoderma or another mould. Remove the affected cake from the chamber immediately. If contamination is limited to a small surface area and has not penetrated deep into the substrate, some growers scrape the patch and continue, but this is risky. When in doubt, discard it. Review your inoculation hygiene for future batches.
Thin, leggy mushrooms
Long stems with small caps indicate too much CO₂ and not enough fresh air. Increase the frequency and duration of your fanning sessions. Check that the polyfill in the holes of your fruiting chamber is not clogged.
Jars not colonising after three weeks
If you see no white growth after three weeks, the spore syringe may have been stored incorrectly, the substrate may have been too hot when inoculated, or the incubation temperature may be too low. For a fresh batch, verify your pressure cooker is reaching full pressure, allow jars to cool fully before inoculating, and check the storage recommendations on your spore syringe packaging.
Ready to grow PF Tek magic mushrooms at home? Browse our full range of spore syringes and pick up your brown rice flour, vermiculite, and glass jars — everything you need is in one place.
Note: If you are suffering from a mental illness and are curious about using psilocybin or any other psychedelic therapy, please consult one of the relevant medical authorities first. Do not self-prescribe — it is vital to have the right support and guidance when using psychedelics as medicine.
January 15, 2014