Votre panier est vide.
Pressure Cooker Mushroom Substrate: Complete Sterilization Guide
Publié sous: Growing & Cultivation
How to Use a Pressure Cooker for Mushroom Substrate: The Complete Guide
Master pressure cooker mushroom substrate sterilization for PF-Tek jars and grain spawn — step by step.
The pressure cooker is the single most important piece of equipment for any serious mushroom cultivator. Without proper sterilization, contamination will almost always beat your mycelium to the substrate — and wasted effort follows. Using a pressure cooker for mushroom substrate gives you a reliable, repeatable method to eliminate every bacterium, mold spore, and heat-resistant endospore that stands between you and a healthy flush. For the full picture of why sterilization matters and which methods suit which situations, read our companion guide on how to sterilize mushroom cultivation materials. This post covers the hands-on how-to: settings, timing, and exact steps for PF-Tek jars and grain spawn.
In this guide: Everything you need to know about using a pressure cooker for mushroom substrate sterilization — from the science of 15 PSI and 121°C, to step-by-step instructions for PF-Tek jars and grain spawn.
You will also find a full supplies table, common mistakes to avoid, and safety tips for working with pressurized steam.
For the wider context — flame sterilization, alcohol disinfection, and the Still Air Box — see our sterilization overview guide.
Why Pressure Cooking Is the Gold Standard for Mushroom Substrate
Boiling water reaches 100°C — hot enough to kill most vegetative bacteria and molds, but not bacterial endospores. Endospores are dormant survival structures that withstand boiling for hours. When your substrate cools, those endospores germinate and become fast-growing contaminants. A pressure cooker solves this by sealing steam under pressure, raising the boiling point well above 100°C. At 15 PSI (pounds per square inch), the internal temperature reaches 121°C — the same threshold used in laboratory autoclaves. Dry heat and alcohol cannot achieve the same penetration for bulk substrate or grain.
This is why pressure cooker mushroom substrate sterilization is the gold standard in home cultivation. It is affordable, accessible, and when done correctly, it matches professional laboratory results. Every serious grower who works with grain spawn, PF-Tek jars, agar plates, or liquid culture relies on a pressure cooker.
Tip: For a broader look at sterilization methods — including flame sterilization for inoculation tools and alcohol disinfection for surfaces — see our full guide to sterilizing mushroom cultivation materials.
What Can You Sterilize in a Pressure Cooker?
The pressure cooker is versatile. Here is what it can handle:
For anything that involves agar work, also read our agar plates guide for the specific ratios and pouring technique.
What You Need: Supplies for Pressure Cooker Mushroom Substrate
Before you start, gather everything on this list. Having the right materials in place makes the process smooth and safe. Most of these items are available directly from our shop.
| Item | Purpose | Where to Get It |
|---|---|---|
| Pressure cooker (15+ PSI rated) | Core sterilization tool. A 22–23 litre model fits 8–10 half-pint jars comfortably. | Kitchen/hardware store or online |
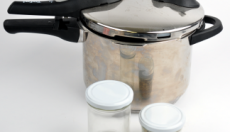
| Glass jars with screw caps | Wide-mouth mason jars for substrate or grain. Must be heat-safe. | Glass jars — Magic Mushrooms Shop |
| Vermiculite (Grade 3) | Mixed with brown rice flour for PF-Tek substrate. Retains moisture and improves texture. | Vermiculite — Magic Mushrooms Shop |
| Brown rice flour | Nutrient source in PF-Tek substrate. Mix with vermiculite and water. | Brown rice flour — Magic Mushrooms Shop |
| Agar powder | For making agar plates or agar slants. Used to isolate and store cultures. | Agar agar 25g — Magic Mushrooms Shop |
| Light malt extract powder | Nutrient additive for agar and liquid culture media. | Light malt extract — Magic Mushrooms Shop |
| Empty grow box | Fruiting chamber for colonized cakes or grain spawn jars after sterilization. | Empty grow box — Magic Mushrooms Shop |
| Aluminium foil | Covers jar lids during sterilization to keep them loose but protected from condensation. | Any supermarket |
| Rack or trivet | Keeps jars off the base of the pressure cooker so glass does not crack from direct heat. | Usually included with pressure cooker |
Tip: Choose a pressure cooker with a reliable pressure gauge and a working safety release valve. Older or second-hand models should have their gaskets and valves inspected before use.
Step-by-Step: Sterilizing PF-Tek Jars with a Pressure Cooker
PF-Tek (Psilocybe Fanaticus Technique) uses small glass jars filled with a mix of brown rice flour, vermiculite, and water. It is one of the most beginner-friendly substrates, and pressure cooker mushroom substrate sterilization is what makes it reliable. Follow these steps carefully.
1
Mix the substrate
Mix the substrate
Combine 2 parts vermiculite, 1 part brown rice flour, and 1 part water in a clean bowl. Mix thoroughly until the vermiculite is evenly coated and the mixture feels just moist — not dripping wet. The field capacity test: squeeze a handful. Only a few drops should fall. If it streams water, it is too wet and needs more dry vermiculite.
2
Fill jars and add a dry layer
Fill jars and add a dry layer
Fill each jar to about three-quarters full with the wet substrate mix. Then add a thin dry layer of plain vermiculite on top — roughly 1 cm deep. This dry barrier helps prevent contamination at the inoculation point when you later inject spores. Do not pack the substrate tightly. Leave it loose so mycelium can colonize it easily.
3
Cover lids with aluminium foil
Cover lids with aluminium foil
Screw the jar lids on loosely — just enough to keep them in place. Then wrap each lid and the top of the jar with a square of aluminium foil. The foil protects the lid from condensation dripping back into the jar during cooling. The loose lid allows steam to escape freely, which is important for pressure equalization.
4
Set up the pressure cooker
Set up the pressure cooker
Place the rack or trivet on the base of the pressure cooker. This is non-negotiable — jars resting directly on the base can crack from the concentrated heat. Add water to the pressure cooker: about 2–3 cm deep, or as specified in your model's manual. The water produces the steam that builds pressure.
5
Load jars and close the lid
Load jars and close the lid
Place the jars upright on the rack. They should not touch the walls of the pressure cooker. If they press against the walls, the glass can crack when it expands from heat. Close the pressure cooker lid securely and make sure the sealing gasket is seated correctly.
6
Heat to 15 PSI and maintain for 60–90 minutes
Heat to 15 PSI and maintain for 60–90 minutes
Turn the heat to high. Let steam vent freely for a few minutes to purge air from the cooker before the pressure builds. Once the pressure indicator reaches 15 PSI (121°C), reduce the heat to a level that maintains steady pressure without it climbing higher. Hold this pressure for 60 to 90 minutes for PF-Tek jars. Smaller jars can be done at 60 minutes; larger jars or a full load benefit from 90 minutes.
Warning: Do not walk away during the sterilization run. Monitor the pressure gauge regularly. If pressure drops, the temperature also drops and sterilization is incomplete. If pressure rises too high, reduce the heat immediately.
7
Turn off heat and cool completely — do not rush this step
Turn off heat and cool completely — do not rush this step
When the timer is done, turn off the heat and leave the pressure cooker completely undisturbed. Do not run it under cold water. Do not open the pressure valve to speed up depressurization. The pressure must drop naturally. This typically takes 4 to 5 hours, or you can leave it overnight. Only open the lid when the pressure indicator has fully returned to zero and the cooker feels cool to the touch.
Danger — Steam burns: Opening a pressurized cooker while hot releases a violent burst of superheated steam. This causes severe burns. Always wait for full natural depressurization before opening. Never force the lid.
Once cool, move the jars to a clean area and let them rest for a further 12–24 hours before inoculating. This resting period allows any residual heat to fully dissipate and helps you spot any lids that have bulged — a sign of contamination already present in the substrate before sterilization.
Step-by-Step: Sterilizing Grain Spawn in a Pressure Cooker
Grain spawn — rye berries, millet, wheat berries, or brown rice in jars — is the most nutrient-dense substrate you will sterilize. Because grain is dense and holds a lot of moisture internally, it requires a longer run at full pressure. The process for pressure cooker mushroom substrate sterilization for grain is similar to PF-Tek, but with key differences in preparation time.
1
Soak the grain
Soak the grain
Rinse your grain thoroughly under cold water. Then soak it in water for 12 to 24 hours. Soaking hydrates the grain fully and softens it, which allows heat to penetrate evenly during sterilization. Rye and wheat berries benefit from the longer end of this range; smaller grains like millet can soak for 12 hours.
2
Simmer until tender, then drain
Simmer until tender, then drain
Drain the soaked grain and transfer it to a pot. Cover with fresh water and bring to a gentle simmer for about 15 to 20 minutes. The grain should be fully cooked through but still firm — not mushy or split open. Drain it in a colander and spread it on a clean surface or baking tray to surface-dry for 20 to 30 minutes. Excess surface moisture can cause wet grain spawn, which is prone to bacterial contamination.
Tip: To test if your grain is ready, press a kernel between your fingers. It should give without crumbling, and you should not see a white starchy core in the middle. A white core means the grain needs more simmering time.
3
Load jars and prepare the pressure cooker
Load jars and prepare the pressure cooker
Fill jars loosely with the surface-dried grain — about three-quarters full. Screw on lids loosely and cover with aluminium foil. Set up the pressure cooker with a rack and water, exactly as described for PF-Tek jars above.
4
Sterilize at 15 PSI for 90 minutes
Sterilize at 15 PSI for 90 minutes
Grain spawn always needs the full 90 minutes at 15 PSI (121°C). Shorter runs leave the centre of dense jars under-sterilized. Monitor the gauge, maintain steady pressure, then allow full natural depressurization — 4 to 5 hours minimum.
5
Cool and rest before inoculation
Cool and rest before inoculation
Move cooled grain jars to a clean space and rest for at least 24 hours. Inoculating warm jars stresses mycelium and promotes bacterial growth. Inoculate using a spore syringe, or transfer colonized agar directly. See the agar plates guide for that workflow.
Common Mistakes That Ruin a Sterilization Run
Even experienced growers make these errors. Understanding them in advance saves a lot of frustration and wasted substrate.
For more on diagnosing what went wrong in a grow, read our contamination identification guide.
Pressure Cooker Care and Safety
A pressure cooker is a long-term investment. Safety checks before every run are not optional — they are essential.
Before Every Run
After Every Run
Warning: Replace the gasket at least once a year, or whenever it shows visible wear. A failing gasket is the most common cause of failed sterilization runs. Most manufacturers sell replacement gaskets — check your model number.
For a full breakdown of all sterilization methods — including why 70% isopropyl outperforms 99% for surfaces, and how a Still Air Box reduces contamination risk during inoculation — visit our complete sterilization guide.
Quick Reference: Pressure Cooker Mushroom Substrate Settings
| Pressure | 15 PSI |
| Temperature at 15 PSI | 121°C |
| PF-Tek jars (BRF + vermiculite) | 60–90 minutes |
| Grain spawn (rye, millet, wheat) | 90 minutes |
| Agar / liquid culture | 30–45 minutes |
| Cool-down time | 4–5 hours minimum (natural depressurization only) |
| Rest before inoculation | 12–24 hours after cooling |
Ready to sterilize your first batch? Find everything you need — from glass jars and vermiculite to brown rice flour and agar powder — in our sterilization supplies section.
Note: If you are suffering from a mental illness and are curious about using psilocybin or any other psychedelic therapy, please consult one of the relevant medical authorities first. Do not self-prescribe — it is vital to have the right support and guidance when using psychedelics as medicine.
Décembre 5, 2012