Votre panier est vide.
How to Sterilize Mushroom Cultivation Materials: Methods, Tools & Clean Workspace Tips
Publié sous: Growing & Cultivation
The complete guide to sterile technique for mushroom growers — methods, materials, and when to use each one
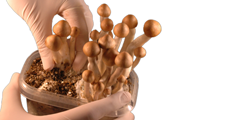
Ask any experienced mushroom cultivator what separates a successful grow from a contaminated mess, and the answer is almost always the same: sterile technique. If you want to sterilize mushroom cultivation materials properly, you need to understand not just how to do it, but why each method exists and when to apply it. This guide covers every major sterilization and disinfection method used in home mushroom cultivation — from a quick flame pass on a needle to a full pressure-cooker run for grain spawn.
In this guide: How to sterilize mushroom cultivation materials at home using five proven methods — flame sterilization, pressure cooking, pasteurization, alcohol disinfection, and a still air box.
You will also find a quick-reference table showing which materials need which treatment, a full supplies list with shop links, and practical tips for keeping your workspace clean at every stage.
Working through agar plates or grain spawn for the first time? See our step-by-step pressure cooker guide for a deeper look at that specific method.
Sterilization vs. Disinfection: What Is the Difference?
These two terms are often used interchangeably, but they mean different things — and confusing them is a common source of contamination.
Sterilization eliminates all microbial life, including bacteria, mold spores, fungal spores, and heat-resistant bacterial endospores. Nothing survives. Sterilization requires either high heat under pressure (like a pressure cooker at 15 PSI) or dry heat for a prolonged period.
Disinfection reduces microbial load to a safe level but does not kill everything. Alcohol wipes, for example, disinfect surfaces rather than sterilize them. Disinfection is sufficient for your hands, workspace surfaces, and the outside of jars — but it is never enough for nutrient-rich substrates like grain or brown rice flour mix, where surviving spores will find plenty of food to grow on.
Tip: A good rule of thumb — if it goes inside a jar or bag that mycelium will colonize, sterilize it. If it is an external surface or your skin, disinfect it.
What Needs Sterilizing? Quick Reference Table
Not every material in your grow setup requires the same treatment. Use this table to decide what level of cleanliness each item needs before you start work.
| Grain spawn (rye, millet, wheat berries) | Full sterilization — pressure cooker at 15 PSI for 90 minutes |
| PF-Tek substrate jars (BRF + vermiculite) | Full sterilization — pressure cooker at 15 PSI for 60–90 minutes |
| Agar plates and liquid culture | Full sterilization — pressure cooker at 15 PSI for 20–30 minutes |
| Bulk substrate (CVG — coco coir, vermiculite, gypsum) | Pasteurization — bucket tek with boiling water, sealed 6–8 hours |
| Inoculation tools (needles, scalpels, loops) | Flame sterilization before each use, then allow to cool |
| Workspace surfaces (counters, inside SAB) | Disinfection — 70% isopropyl alcohol wipe-down |
| Hands and gloves | Disinfection — 70% isopropyl or hand disinfectant gel |
| Outside of jars and bags | Disinfection — 70% isopropyl wipe before opening |
Method 1: Flame Sterilization for Tools
Flame sterilization is the fastest way to sterilize mushroom cultivation materials that are small and metal — inoculation needles, scalpels, and transfer loops. The technique takes seconds and can be repeated between each transfer without interrupting your workflow.
1
Heat the metal tip in a flame
Heat the metal tip in a flame
Hold the tip of your needle or scalpel blade in the flame of a torch lighter until it glows orange-red. The heat destroys any microbial contamination on contact.
2
Let it cool before touching substrate
Let it cool before touching substrate
A glowing-hot needle will kill mycelium on contact. Wait five to ten seconds, or dip the tip briefly into sterile water or agar at the edge of the plate. You will see a faint sizzle if it is still too hot — wait a moment longer.
3
Re-sterilize between each transfer
Re-sterilize between each transfer
Every time your tool touches a surface — even a clean one — re-flame it before the next contact. This habit prevents cross-contamination between jars, plates, or cultures.
Tip: A butane torch lighter gives a hotter, more focused flame than a disposable lighter. It reaches working temperature faster and reduces soot deposits on your tools, which keeps agar plates cleaner when you work on them.
How to Sterilize Mushroom Cultivation Materials with a Pressure Cooker
For nutrient-rich substrates and growth media, nothing replaces the pressure cooker. This is the method serious growers rely on to sterilize mushroom cultivation materials at scale, because it is the only widely available home technique that reliably destroys bacterial endospores.
Endospores are the real problem in substrate sterilization. Regular boiling at 100°C kills most bacteria and mold, but certain bacteria — Bacillus species in particular — form heat-resistant spores that survive normal boiling and then germinate once your substrate cools down. A pressure cooker at 15 PSI raises the boiling point of water to around 121°C, which is hot enough to destroy endospores given sufficient time.
General time guidelines at 15 PSI:
Warning: Never rush the cool-down phase. Inoculating warm jars causes condensation inside, which dramatically increases contamination risk. Let jars cool for at least four to five hours — or overnight — before you open the pressure cooker. See our full pressure cooker sterilization guide for all the details, including common mistakes to avoid.
The pressure cooker method is covered in full in our companion article: How to Use a Pressure Cooker for Mushroom Substrate. That guide walks through equipment selection, the full step-by-step process for PF-Tek jars and grain spawn, and troubleshooting tips for common problems.
Method 3: Pasteurization for Bulk Substrate (CVG)
Not everything needs to be sterilized. Low-nutrient bulk substrates like coco coir, vermiculite, and gypsum (CVG) can be pasteurized instead. Pasteurization heats the material to around 60–80°C for one to two hours — hot enough to kill most competing organisms, but not so extreme that it wipes out every microbe. The beneficial microbes that survive actually help defend your substrate against contamination after spawning.
This approach has become increasingly popular among home cultivators because it is simple, energy-efficient, and surprisingly effective. Many experienced growers report fewer contamination issues with pasteurized CVG than with fully sterilized bulk substrate, precisely because those surviving beneficial organisms compete with any mold spores that land on the surface after you open the container.
The Bucket Tek Method
The most common way to pasteurize CVG at home is the bucket tek method:
1
Mix your dry ingredients in a clean 5-gallon bucket
Mix your dry ingredients in a clean 5-gallon bucket
Combine coco coir, vermiculite, and a small amount of gypsum. A standard ratio is one 650g brick of coco coir, 1.5 to 2 litres of vermiculite, and about 2 tablespoons of gypsum.
2
Pour boiling water over the dry mix
Pour boiling water over the dry mix
Use approximately 3.5 to 4.5 litres of boiling water. Pour it evenly over the dry ingredients and stir briefly to make sure everything is saturated.
3
Close the lid and wrap the bucket in a blanket
Close the lid and wrap the bucket in a blanket
The blanket insulates the bucket and keeps the internal temperature above 60°C for several hours. This sustained heat is what pasteurizes the substrate. Leave the bucket sealed for at least 6 to 8 hours — or simply overnight.
4
Let it cool to room temperature before use
Let it cool to room temperature before use
Do not add spawn until the substrate has cooled completely. Warm substrate will damage or kill your mycelium. When you open the bucket, the CVG should feel moist but not dripping — squeeze a handful and only a few drops of water should come out (field capacity).
Tip: Pasteurization is best suited for low-nutrient substrates like CVG. If your substrate contains grains, manure, or supplemented sawdust, use a pressure cooker instead — the higher nutrient content demands full sterilization to prevent contamination.
Method 4: Alcohol Disinfection for Surfaces and Skin
Isopropyl alcohol (IPA) is your everyday disinfectant for everything that does not go into a pressure cooker. It reduces surface contamination quickly and evaporates cleanly without leaving residue. However, it does not sterilize — alcohol cannot destroy endospores, and it loses effectiveness on surfaces that are visibly dirty.
Why 70% Works Better Than 99%
This surprises many beginners. A concentration of 70% isopropyl alcohol is more effective against bacteria and fungi than 99% IPA. The reason is that the water content in 70% IPA slows evaporation, giving the alcohol more contact time with microbial cells. Pure 99% IPA evaporates almost instantly, which limits its ability to penetrate cell walls. For surface disinfection, 70% is the standard in both laboratory and medical settings, as noted by the CDC guidelines on disinfection and sterilization.
Use alcohol disinfection for:
Tip: Pre-soaked alcohol swabs are ideal for disinfecting injection ports and jar lids. They are convenient, consistent, and less likely to drip than a spray bottle during detailed work.
Method 4: Still Air Box (SAB) — The Beginner's Clean-Air Zone
A laminar flow hood is the professional solution for contamination-free transfers. But a still air box does the same job at a fraction of the cost, and it is perfectly adequate for most home cultivators working with spore syringes, spore prints, or small agar work.
A still air box is nothing more than a large clear plastic tub — typically 60–80 litres — with two arm-sized holes cut into one end. You work inside the box, where the air is undisturbed. Because there is no air movement, airborne contaminants do not settle on your open jars, plates, or tools.
1
Choose a large, clear storage tub
Choose a large, clear storage tub
You need enough space to comfortably fit both arms and manoeuvre jars or plates. A clear tub lets you see what you are doing without removing the box lid.
2
Cut arm holes in one short end
Cut arm holes in one short end
Each hole should be large enough to fit your arm up to the elbow — roughly 15 cm in diameter. Smooth the edges so they do not tear your gloves.
3
Wipe down the inside with 70% IPA
Wipe down the inside with 70% IPA
Before each session, spray and wipe all interior surfaces with isopropyl alcohol. Let it sit for a minute before you start work to allow residual spray to settle.
4
Let the air settle before working
Let the air settle before working
After wiping down and placing your equipment inside, wait five to ten minutes before beginning any transfers. This allows any disturbed air currents to die down completely.
Warning: A still air box is only effective if the room air itself is reasonably clean. Close windows, turn off fans and air conditioning, and avoid working near vents. Contamination rates rise sharply if there is airflow in the room during your session.
How to Keep Your Workspace Clean: Practical Steps
Even perfect sterilization of your substrate will not save you if you introduce contamination during inoculation. Your workspace habits matter just as much as the methods you use to sterilize mushroom cultivation materials beforehand. Follow these steps consistently to give your grows the best chance.
1
Shower and put on clean clothes before you start
Shower and put on clean clothes before you start
Your skin and hair carry billions of microorganisms. A quick shower before a cultivation session removes a large percentage of surface contaminants before you even touch your equipment.
2
Remove pets from the room
Remove pets from the room
Pet fur and dander carry mold spores and bacteria. Even well-groomed pets shed contaminants into the air continuously. Keep them out of the room during inoculation and transfer work.
3
Wipe all surfaces with 70% IPA
Wipe all surfaces with 70% IPA
Tables, counters, your still air box — all get a thorough wipe-down before you bring sterilized jars anywhere near them. Pay attention to areas you might rest jars or tools on without thinking.
4
Wear nitrile gloves and a face mask
Wear nitrile gloves and a face mask
Gloves eliminate fingerprint contamination and make it easy to re-disinfect your hands between steps. A simple surgical mask significantly reduces the number of airborne particles you exhale over open containers.
5
Close all windows and turn off fans
Close all windows and turn off fans
Air movement is your enemy during transfers. Still air means airborne contaminants sink slowly downward rather than swirling across your open jars. Close everything before you start, and do not open doors mid-session if you can help it.
Tip: If you are seeing recurring contamination despite good technique, check your grow space for hidden mold — behind walls, under sinks, or in poorly ventilated areas. Environmental mold pressure can overwhelm even excellent sterile technique. Our contamination guide covers the most common culprits and how to identify them.
Supplies to Sterilize Mushroom Cultivation Materials at Home
You do not need expensive laboratory equipment to sterilize mushroom cultivation materials effectively at home. The table below covers everything you need for a complete sterile technique setup, with links to the relevant products in our shop.
| Item | Purpose | Where to Get It |
|---|---|---|
| Spirit burner | Flame sterilization of needles, scalpels, and inoculation loops | Torch Lighter (Butane) — Magic Mushrooms Shop |
| Alcohol swabs | Disinfecting injection ports, jar lids, and small surfaces | Alcohol Swabs — Magic Mushrooms Shop |
| Hand disinfectant gel | Disinfecting hands and gloves during transfers | Softa-Man Hand Disinfectant — Magic Mushrooms Shop |
| Surface disinfectant spray | Wiping down surfaces, still air box, outside of jars | Surface Disinfectant Spray — Magic Mushrooms Shop |
| Sterile nitrile gloves | Hand barrier during all inoculation work | Sterile Nitrile Gloves — Magic Mushrooms Shop |
| Pressure cooker (minimum 8 litre) | Sterilizing grain spawn, PF-Tek jars, agar, and liquid culture | Kitchen stores or online — see our pressure cooker guide for size recommendations |
| Full sterilization supplies range | Browse all sterilization-related products in one place | Sterilization Category — Magic Mushrooms Shop |
Connecting Sterilization to Your Grow Workflow
Sterile technique is not a single step — it runs through your entire cultivation process. Before you even think about inoculation, your substrate must be properly sterilized. Before you open a jar, your surfaces and tools must be disinfected. And during every transfer — whether you are working with a spore syringe, a spore print, or agar cultures — your flame and your alcohol wipes should be right next to you.
If you are following the PF-Tek method, your substrate jars go straight from the pressure cooker into your still air box after cooling. If you are working with agar for culture isolation or clone work, the same principle applies — sterilize first, transfer in a clean environment, and re-sterilize your tools between every contact. For more on working with agar, see our guide to making agar plates for mushroom cultivation.
The most important single upgrade you can make to your sterile workflow is to start using a pressure cooker if you are not already. It is the only reliable way to sterilize mushroom cultivation materials that contain nutrients — and without it, contamination is nearly inevitable on grain or bulk substrate. Our full pressure cooker guide covers everything from choosing the right cooker to step-by-step instructions for grain spawn and PF-Tek jars.
Ready to upgrade your sterile technique? Browse the complete sterilization supplies range at Magic Mushrooms Shop — torch lighters, alcohol swabs, surface disinfectant, nitrile gloves, and everything else you need for a clean grow.
Note: If you are suffering from a mental illness and are curious about using psilocybin or any other psychedelic therapy, please consult one of the relevant medical authorities first. Do not self-prescribe — it is vital to have the right support and guidance when using psychedelics as medicine.
Novembre 7, 2012