Votre panier est vide.
How to Make a Psilocybe Cubensis Spore Print: Step-by-Step Guide
Publié sous: Growing & Cultivation
Learn how to make a Psilocybe cubensis spore print step by step — plus storage tips, supplies, and how to use your print for microscopy or cultivation.
In this guide: Everything you need to know about making a Psilocybe cubensis spore print. We cover the step-by-step process, the best surfaces and tools, how to store prints for years, and what you can do with them afterward.
Whether you want to identify mushroom species, archive genetics, or start a culture, a spore print is the foundation.
A Psilocybe cubensis spore print is a collection of spores deposited by a mature mushroom cap onto a sterile surface. Making one is simple, requires minimal equipment, and gives you a genetic archive that can last for years. In fact, properly stored spore prints remain viable for five to ten years or even longer.
Spore prints serve multiple purposes. Mycologists use them for species identification, because the colour and pattern of the deposit reveal important taxonomic information. Cultivators use them as the starting point for agar cultures, liquid cultures, and grain inoculation. Meanwhile, researchers use them for microscopy — studying spore morphology under magnification. Whatever your goal, this guide walks you through the process from start to finish.
What Is a Psilocybe Cubensis Spore Print?
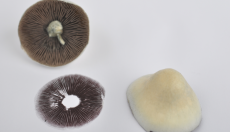
When a mature mushroom opens its cap fully, the gills underneath release millions of microscopic spores. By placing the cap gill-side down on a surface and covering it, you capture those spores in a natural pattern. That deposit — a fine, powdery layer — is your spore print.

Psilocybe cubensis produces dark purplish-brown to nearly black spores. This distinctive colour helps distinguish it from other species. For more background on the species itself, see our guide on what magic mushrooms are and the Psilocybe cubensis Wikipedia entry for detailed taxonomy.
Supplies You Need for a Spore Print
Before you start, gather the following supplies. Sterility matters at every step — contamination ruins both the print and any future cultures you make from it.
| Supply | Purpose | Where to Get It |
|---|---|---|
| Mature Psilocybe cubensis mushroom | Source of spores — cap must be fully open with visible dark gills | Your own grow kit harvest |
| Sterile aluminium foil | Best surface for capturing and storing the print | Cultivation supplies |
| Sterilised knife or scissors | Cutting the stem cleanly from the cap | Kitchen or lab supply |
| Glass jar or bowl | Covering the cap to create a humid microclimate | Any kitchen store |
| 70% isopropyl alcohol | Sterilising surfaces, foil, and tools | Cultivation supplies |
| Sterile gloves | Preventing contamination from skin contact | Cultivation supplies |
| Ziplock bag + label | Sealing and identifying your stored print | Household or lab supply |
| Silica gel packet (optional) | Absorbing residual moisture during long-term storage | Online or pharmacy |
How to Make a Psilocybe Cubensis Spore Print: Step by Step
Follow these seven steps carefully. The entire process takes 12 to 24 hours, but active work time is under 10 minutes.
1
Choose a Mature Mushroom
Choose a Mature Mushroom
Select a Psilocybe cubensis mushroom with a fully opened cap and dark, visible gills. Timing matters — the cap should have flattened out or even curled slightly upward. If the veil underneath has just broken, that is the ideal moment. Younger mushrooms with closed caps will not release enough spores.
2
Sterilise Your Workspace and Tools
Sterilise Your Workspace and Tools
Wipe down your work surface with 70% isopropyl alcohol. Also sterilise your knife or scissors, the aluminium foil, and the glass jar or bowl. Wear sterile gloves throughout. This step prevents contamination, which is the main reason spore prints fail.
3
Cut the Stem
Cut the Stem
Use your sterilised knife to cut the stem as close to the cap as possible. You only need the cap for the spore print. Set the stem aside — you can dry it for other purposes if you wish.
4
Place the Cap Gill-Side Down
Place the Cap Gill-Side Down
Place the mushroom cap directly onto your sterile aluminium foil with the gills facing down. Aluminium foil works best because it is easy to sterilise, fold, and store. If you prefer, you can also use a glass slide or half-white/half-black paper for identification purposes.
Tip: Psilocybe cubensis spores appear dark purple-brown. On aluminium foil, they show up clearly. However, if you work with species that produce white or light-coloured spores, use dark paper or glass instead.
5
Cover and Wait 12–24 Hours
Cover and Wait 12–24 Hours
Place a clean glass jar or bowl over the cap to create a humid microclimate. This helps the gills release spores evenly. Then simply wait. After 12 to 24 hours, the spores will have fallen and settled onto the foil in a radial pattern matching the gill structure.
6
Remove the Cap
Remove the Cap
After the waiting period, carefully lift the glass cover first. Then gently remove the mushroom cap from the foil. Beneath it, you will see a fine, powdery deposit — your Psilocybe cubensis spore print. Handle it carefully, because the spores dislodge easily.
7
Dry and Seal
Dry and Seal
Allow the spore print to air-dry completely in a clean environment. This usually takes one to two hours. Once dry, fold the aluminium foil to enclose the print. Place the folded foil packet into a labelled ziplock bag. Write the strain name and date on the label so you can track it later.
How to Store a Spore Print
Proper storage keeps your Psilocybe cubensis spore print viable for years. Follow these guidelines:
What You Can Do With a Spore Print
A Psilocybe cubensis spore print opens up several paths. Here are the most common uses:
Species Identification and Microscopy
Scrape a tiny amount of spore material onto a glass slide, add a drop of sterile water, and examine under a microscope. Spore colour, shape, and size reveal key taxonomic details. Psilocybe cubensis spores measure roughly 11.5–17 × 8–11.5 µm and appear sub-ellipsoid under magnification.
Starting a Culture on Agar
Transfer a small scraping from your print to a nutrient agar plate inside a still air box. Within 3 to 7 days, you should see white mycelial growth. From there, you can make agar-to-agar transfers to purify the culture. Our guide on how to use a spore print covers this process in full detail.
Making a Spore Syringe
Dissolve a small amount of spore material in sterile distilled water to create a spore syringe. You can then use this syringe to inoculate grain jars or bags. Alternatively, you can skip this step and buy ready-made spore syringes directly from our shop.
Creating Liquid Culture
Transfer spore material into a sterile nutrient broth. Over 1 to 2 weeks, mycelium establishes throughout the liquid. This multiplied culture inoculates grain spawn much faster than raw spores. For more on the full cultivation pipeline, see our post on spore print to grain spawn.
Long-Term Genetic Archiving
Spore prints serve as the best long-term format for preserving mushroom genetics. Because they store dry and compact, you can build an entire strain library in a small box. Many serious mycologists keep both prints for archiving and spore vials for active work.
Spore Print vs Other Spore Formats
How does a spore print compare to other ways of storing and using Psilocybe cubensis spores? This table gives you a quick overview:
| Format | Shelf Life | Best For | Buy |
|---|---|---|---|
| Spore print | 5–10+ years | Long-term archiving, microscopy, making your own syringes | Spore prints |
| Spore syringe | 6–12 months | Direct grain inoculation, beginners | Spore syringes |
| Spore vial | 1–2 years | Ready-to-use research, repeated inoculations | Spore vials |
| Liquid culture | 2–6 months | Fast grain colonisation, advanced growers | Liquid cultures |
Common Mistakes When Making a Spore Print
Even though the process is simple, a few mistakes come up repeatedly. Avoid these to get a clean, viable spore print every time:
Pro tip: If you grow your own mushrooms from a grow kit, take a spore print from your best-looking fruiting body in each flush. Over time, this builds a personal genetics collection.
Spore Print Legal Considerations
Psilocybe cubensis spore prints contain no psilocybin or psilocin — the psychoactive compounds only develop when the mycelium grows and fruits. As a result, spore prints occupy a different legal position than mushrooms themselves in many countries:
Always check your local laws. While spore prints themselves are legal in most jurisdictions, cultivating psilocybin mushrooms may carry serious penalties. This guide is for educational and research purposes. Obey the laws in your country or state.
Ready to start? Browse our full collection of Psilocybe cubensis spore prints — made in our Amsterdam lab under sterile conditions. Or explore spore syringes and spore vials for ready-to-use options.
Disclaimer: This article serves educational purposes. Spore prints do not contain controlled substances. However, cultivating psilocybin mushrooms from spores may violate local law. Always verify your legal situation before proceeding.
Janvier 26, 2012