You have no items in your shopping cart.
How to Prepare Magic Mushroom Spores for Microscopy
Posted under: How to's
Mushrooms have captivated human fascination for thousands of years, from their culinary and medicinal uses to their psychedelic properties. For those interested in studying the unique characteristics of these fungi, spore microscopy is an essential tool. In this blog, we'll explore the basics of preparing spores for microscopy, making spore prints, and examining them under a microscope. Whether you're a hobbyist, researcher, or simply curious about the world of mushrooms, this guide will provide you with the knowledge and skills to delve deeper into the fascinating world of mycology.
How to Prepare Magic Mushroom Spores for Microscopy, Short version!
Preparing spores for microscopy can be a challenging task, but it's essential for identifying magic mushroom species and conducting research. Follow these steps to prepare your magic mushroom spores for microscopy:
Step 1: Cleanliness is Key
Before beginning, it's crucial to ensure everything is clean to minimize the chance of contamination. Close any windows or doors to reduce air currents, take a shower, and wear clean clothes. Clean all of your tools, including the microscope, slides, needle, syringe, and alcohol wipe.
Step 2: Prepare the Spores
To prepare the spores, agitate the syringe to ensure even distribution. Use a still air box, if possible, to minimize airborne contaminants. Squeeze a small amount of spore solution (1cc) onto a slide, and if necessary, heat the needle with a lighter until it glows red to kill any contaminants.
Step 3: Sterilize Your Tools
Before handling spores, sterilize your tools by heating them in a flame or using a disinfectant solution such as ethanol. Work in a clean and well-ventilated area to minimize the risk of contamination.
Step 4: Observe Spores Under a Microscope
To observe spores under a microscope, collect a small number of spores using sterile forceps and place them onto a slide with a droplet of distilled water. Use the microscope to examine the spores, adjust the focus and lighting, and take notes or photographs of your findings.
Preparing magic mushroom spores for microscopy requires patience, attention to detail, and a sterile working environment. By following these steps, you'll be able to identify magic mushroom species and conduct research with greater ease and accuracy.
Let go and get into details! How to Prepare Magic Mushroom Spores for Microscopy, Long version!
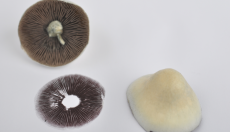
A spore print is a collection of spores released by a mushroom that has matured and developed gills or pores. It is a valuable tool for identifying mushroom species and selecting spores for microscopy research.
Here's how to make a spore print:
- Choose a mature mushroom: Select a mature mushroom with fully developed gills or pores. It is important to select a healthy and fresh mushroom to ensure that the spores are viable.
- Prepare the cap: Cut off the stem of the mushroom, leaving the cap intact. Place the cap gill or pore side down on a piece of paper or glass surface. You can use white or black paper, depending on the color of the spores.
- Cover and wait: Cover the mushroom cap with a glass or bowl to protect it from dust and other contaminants. Leave the mushroom for several hours or overnight to allow the spores to drop onto the paper or glass.
- Collect the spores: Carefully remove the cap and observe the spore print that has formed on the paper or glass. Use a sterilized instrument, such as a scalpel or knife, to collect the spores from the print.
- Store the spores: Place the spores in a sterile container or a spore syringe. Keep the spores in a cool and dry place until you are ready to use them.
When handling spores, it's important to ensure that the tools you use are sterile to avoid contamination. You can sterilize your tools by heating them in a flame or using a disinfectant solution such as ethanol. It's also a good idea to work in a clean and well-ventilated area to minimize the risk of contamination.
Magic mushroom spores can be identified by their unique characteristics such as color, shape, and size. For example, Psilocybe cubensis spores are usually dark purple-brown in color and have a characteristic teardrop shape. Other species of magic mushrooms may have spores that are light brown, golden, or black.
Preparing Spores for Microscopy
Before you can examine spores under a microscope, you need to prepare them for viewing. Here are some steps to follow:
- Collect spores: Using sterile forceps or a scalpel, transfer a small amount of spores from your spore print to a clean glass slide.
- Add liquid: Add a drop of distilled water or a spore suspension solution to the spores on the slide. This will help to separate the spores and make them easier to observe.
- Mix the spores: Gently mix the spores and the liquid together using a sterilized toothpick or needle. Be careful not to damage the spores.
- Add a cover slip: Place a clean cover slip over the spores and press down gently to flatten the liquid and spores.
- Observe under the microscope: Place the slide on the microscope stage and observe the spores using a low power objective lens. Adjust the focus and lighting to get a clear view of the spores. You may also want to try using a higher power objective lens to see more details.
True the looking glass
Once you have prepared the slides with your spores, you can examine them under a microscope for research purposes. Here's how to do it:
- Prepare the microscope: Clean the microscope and prepare a slide with a drop of distilled water. Sterilize the tools you will be using, such as forceps or a scalpel.
- Collect the spores: Using sterile forceps, carefully collect a small number of spores and place them onto the slide with the water droplet.
- Examine the spores: Use the microscope to examine the spores. Adjust the focus and lighting to observe the details of the spores, such as their shape, size, and color. You can also use staining techniques to enhance the visibility of the spores.
- Document your findings: Take notes or photographs of the spores you have observed. Compare your findings with existing spore morphology databases to identify the species of the mushroom.
Set & Settings
When examining spores of Psilocybe cubensis under a microscope, it's important to use the correct settings to get the best possible view. Here are some recommended settings to use:
Magnification:
Use a magnification of 400x to 1000x to view the spores of Psilocybe cubensis. This allows you to see the spores in detail, including their shape and size.
Lighting:
Use a bright-field microscope with oblique or transmitted lighting to observe the spores. This helps to highlight the details of the spores and make them more visible.
Staining:
Staining the spores can enhance the visibility of the spore wall and help to differentiate between species. Recommended stains for examining Psilocybe cubensis spores include cotton blue, methylene blue, and lactophenol cotton blue.
Focus:
Use the fine focus knob to adjust the focus until the spores are in clear view. The spores of Psilocybe cubensis are roughly elliptical or tear-shaped, so focus on the widest point of the spore to get the best view.
By using these recommended settings, you can get a clear and detailed view of the spores of Psilocybe cubensis. This can be helpful in identifying the species and studying its characteristics.
Where to Look for Magic Mushroom Spores
When examining spores from magic mushrooms, there are certain characteristics to look for that can help you identify the species of mushroom. Here are a few things to keep in mind:
- Spore color: The color of the spores can vary depending on the species of mushroom. For example, Psilocybe cubensis spores are usually a dark purplish-brown color, while Panaeolus cyanescens spores are a dark gray or black.
- Spore shape and size: The shape and size of the spores can also vary between species. Psilocybe cubensis spores are roughly elliptical in shape, with a size of around 10-17 micrometers.
- Spore print: When making a spore print, pay attention to the color and pattern of the spores. This can also help you identify the species of mushroom.
- Other characteristics: When examining spores, you may also want to look for other characteristics, such as the presence of a germ pore or the texture of the spores.
By paying attention to these characteristics, you can gain a better understanding of the species of magic mushroom you are examining and make more informed decisions in your research or cultivation efforts.
Overall, making a spore print and examining spores under a microscope can be a fascinating and informative process for both amateur and professional mycologists. It allows for a deeper understanding of the characteristics of different mushroom species and can contribute to research in the field of mycology.
February 24, 2022