You have no items in your shopping cart.
PF Tek Instructions (+ video): How to grow magic mushrooms with PF Tek Method
Posted under: How to's

PF Tek enables cultivators grow magic mushrooms from scratch. This certified method for psilocybe cubensis cultivation is easy, cheap and has a high success rate. We've noticed that a lot of Magic Mushroom Shop customers have been asking for PF Tek Instructions. In this post we will guide you how to prepare your PF Tek substrate and what you need to make a PF Tek cakes.
How to grow magic mushrooms: PF Tek instructions
"PF-Tek is to the entheogenic experience what the hot water extraction is to the caffeine experience. People will be using it many centuries from now.” -Psylocybe Fanaticus-
With this manual you'll have a step-by-step overview. Everything will be explained: from the making of the substrate to the inoculation of the jars with spores and the cultivation of mushrooms.
Read the entire PF Tek Instructions carefully to learn how the PF-Tek method works and what you need to cultivate your own irresistible magic mushroom.
What is PF-Tek?
PF-Tek is a simple method to put together a reliable substrate for the cultivation of mushrooms. The biggest advantage is that the required materials are easy to obtain and you can prepare the substrate with household items. The complete list of supplies can be found here: List of materials
The PF in PF-Tek stands for Psylocybe Fanaticus and Tek for technique. The PF Tek is developed by Psylocybe Fanaticus, the American Robert ‘Billy’ McPherson. The substrate turned out to be the perfect soil for thepsilocybe cubensis mushrooms. There even are spores named after mr. Fanaticus: the PF-original. The PF Tek manual has spread around the world and is celebrated by many mushroom cultivators. It's simplicity has made it the most used method to create substrate cakes.
The PF Tek Instructions video
About this manual
In this PF-Tek cultivation manual four jars of 240ml will be used. This size is easily colonized by the mycelium and it contains sufficient nutrients for multiple flushes of mushrooms.
You can use jars or glasses of a larger size, but the risk of contamination will be greater then.
The manual covers the following steps:
- The making of substrate
- Filling the jars
- Sterilizing of PF-Tek substrate cakes
- Regular pan
- Pressure cooker
- Inoculation and incubation
- Cultivation of Mushrooms
- List of materials
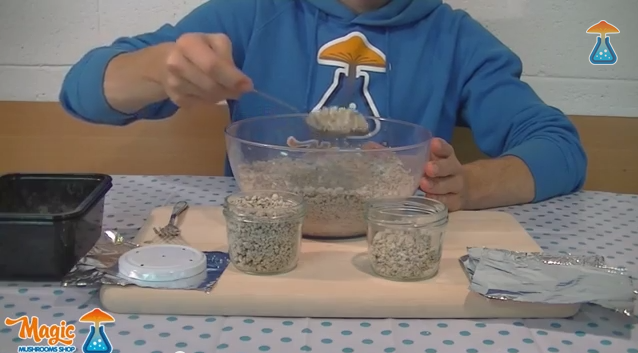
Making of the PF-Tek substrate
[PF Tek instruction video part 1: http://dai.ly/x1smw4q]
(Necessary: brown rice flour, vermiculite, water, bowl, fork/spoon)
The PF-Tek substrate consists of only three ingredients:
1. Brown rice flour
2. Vermiculite
3. Water
By mixing the ingredients in the correct ratio you will get the ideal cultivation soil for your mushrooms.
The ratio you use is 2:1:1. Two parts vermiculite, one part brown rice flour and one part water.
| Jar 240ml (½ pint) | Vermiculite | Brown rice flour | Water |
| 1 jar | 120 ml | 60 ml | 60 ml |
| 4 jars | 480 ml | 240 ml | 240 ml |
| 6 jars | 720 ml | 360 ml | 360 ml |
| 8 jars | 960 ml | 480 ml | 480 ml |
When mixing the PF-Substrate, use a bowl that’s big enough for all ingredients. Make sure the bowl is thoroughly clean!
- Spread vermiculite over the bowl
- Gradually add some of the water and mix with the substrate
- The substrate has to be damp, but not soaked! If you hold the bowl on its side there should be no water pouring out.
- Add brown rice flour
- Mix the two ingredients together
Water, brown rice flour and vermiculite mixed? Then your PF-Tek substrate is ready!
Tip: Gradually add some water to the substrate to prevent it from getting too wet. You will have to adjust the amount of water, depending on the quality of the used vermiculite and brown rice flour. Higher quality absorbs more water. Make sure you do not add all the water at once to the PF-mix.
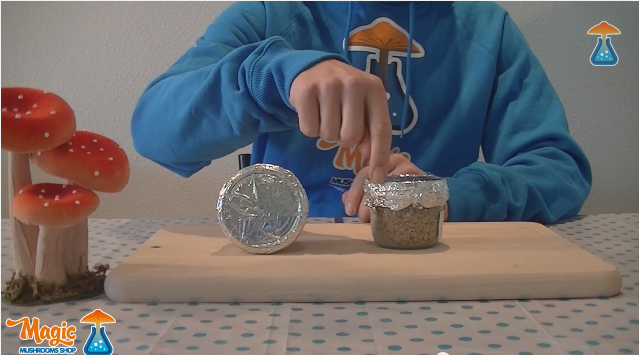
Filling the jars with substrate
(Necessary: substrate, vermiculite, spoon/fork, four jar, alcohol wipe (prep), aluminum foil or cover (lid), awl)
Now that the substrate mix is ready it’s time to fill the jars.
1. Loosen up the substrate mix with a fork. Make sure there are no big chunks.
2. Put the substrate in the jar, till right under the edge. Do not trample it!
3. Add a layer of vermiculite. The vermiculite functions as a filter between the substrate and the air and will keep out micro-organisms that can contaminate the PF-Tek cake.
4. Clean the edge of the jar with an alcohol wipe or kitchen paper.
5. Cover the jar with the cover or with aluminum foil.*
6. Do the same with the other jars.
*Choose between aluminum foil or a cover to cover the jar. It is wise to prepare both before you start.
Cover: Use an awl or drill to make five holes in the cover so that later you can spray the spores. Make four holes in each corner of the edge and one hole in the middle. You can also make the holes using a nail and hammer.
Aluminum foil: Cut three strokes of 15 centimeters per jar. The foil has to be big enough to cover the top side of the jar. Use two layers of foil to cover the jar well (this is where you will pierce through with your spore syringe) but make sure you can take one part off easily.
Tip: Shake the substrate lightly to equally spread it in the jar. The substrate has to be airy so that the spores and the mycelium can spread easily.
Sterilising of PF-Tek substrate
[PF Tek instruction video part 2: http://dai.ly/x1smw5x]
(Necessary: jars with substrate, water, high pan with cover or pressure cooker, covers foil, gas cooker/heat source, cooking counter, tape, marker)
The sterilising of the jars holding the substrate in it is a very important part of the proces.
The substrate has to be sterilised to kill any micro organisms to reduce the chance of contamination. Therefore it is important to do this well.
The sterilising can be done in two ways: with the pressure cooker or a regular pan. Both of these methods will sterilise the substrate by steam.
Sterilising substrate in a Regular pan
- Take a tall pan with a well sealing cover, where you can put all the jars in.
- Put a rack on the bottom of the pan or use covers for this. This will prevent contact from the jars with the hot bottom and prevents the jars from breaking because of the heat.
- Open the cover of the substrate jar slightly and cover with foil. Put all your jars in the pan.
- Fill the pan with water to a maximum of 1 centimeter under the edge of the jars.
- Slowly heat the water to the boiling point.
- Leave it to gently steam for 90 minutes with the cover on the pan. Keep the fire as low as possible so that the water continues to steam. Every now and then, make sure there is enough water in the pan.
- Turn off the fire after a minimum of 90 minutes of steaming. Steaming for a longer period is also an option to be sure of a successful sterilisation of the substrate.
- Leave the jars in the pan to cool off, this can take an entire night. Wait at least five hours.
- Take all the jars out of the pan and label every jar with a number or letter, so that you can tell them apart.
- The jars are now ready for the inoculation with spores.
Sterilising substrate in a pressure cooker
- Read the manual of your pressure cooker and try it out first.
- Put a rack on the bottom of the pressure cooker or use covers. This will prevent contact from the jars with the hot bottom and prevents the jars from breaking because of the heat.
- Fill the pressure cooker with four – five centimeters of water. Or follow the instructions of the pressure cooker’s manual.
- Put all the jars on the rack and close the pressure cooker.
- Heat the pressure cooker slowly and wait for it to reach the right pressure. 15 psi or one atmosphere.
- Let it steam for 45-60 minutes and then turn off the fire.
- Leave the jars in the pan to cool off, this can take an entire night. Wait at least five hours.
- Take all the jars out of the pan and label every jar with a number or letter, so that you can tell them apart.
- The jars are now ready for the inoculation with spores.
Tip: Smell the substrate before and after the sterilising process. You will know what it smells like and you can later smell wether or not the smell has changed. A sour and strong smell can indicate a contamination.
Tip: Keep the jars for a maximum of one week on room temperature in a dark and draft-free place. Check the jars after this period for contaminations to prevent inoculating the contaminated jars with spores. Get rid of the substrate of contaminated jars immediately and disinfect the area and jar.
Inoculation and incubation
[PF Tek instruction video part 3: https://www.dailymotion.com/video/x4i6blm]
(Necessary: spores, spray, sterilised substrate jars, foil, lighter or alcohol burner, alcohol wipes, disinfecting gel, gloves, face mask)
The inoculation of the substrate is the second part of the PF-Tek method. You will have to work sterile and carefully. Ensure you thoroughly clean the area you work in before injecting the substrate jars with spores. The usage of disinfecting gel for your hands and a respirator is recommended. You can also create a ‘glove box’ or inoculation space but this is not necessary if you proceed clean and sterile.
When inoculating you add the spores through a syringe to the PF-Tek substrate you made earlier. The spores develop to mycelium that will slowly colonise the substrate of the jar. Assume a 1 ml spores solution for one jar. You can also use more (2 ml), then the jar shall colonise faster. Spore sprayers contain 10 ml or 20 ml of spore solution, enough for 10 – 20 substrate jars.
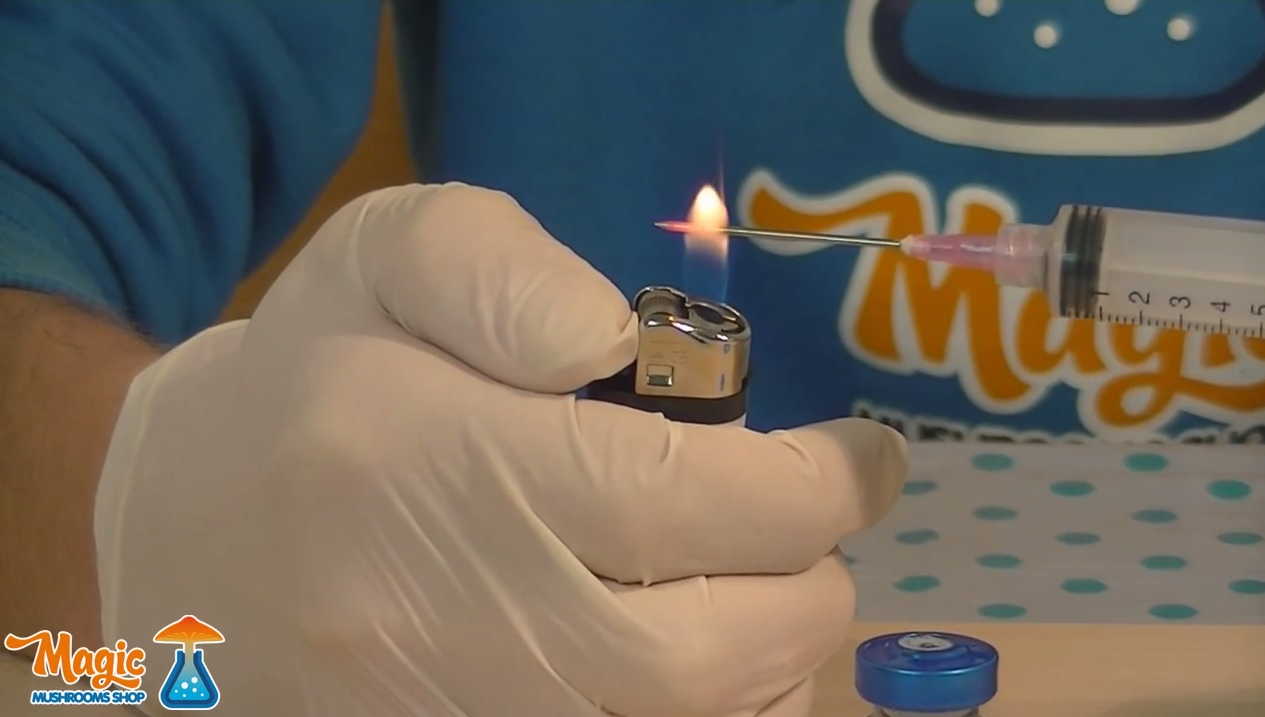
How do you inject the substrate jars with spores?
- Check your substrate jars for contaminations
- Disinfect your workplace, wash your hands and put the respirator on. Gloves are optional.
- Prepare everything you need: Spore syringe, burner, jars, foil
- Prepare the spore syringe according to the added instructions.
- Heat the needle of the spore syringe till its red hot, leave it to cool for a moment.
- Remove the foil from the cover. If you only used foil, remove just the top layer of foil.
- Stick the needle of the spore syringe entirely through the cover or the foil along the edge of the jar.
- Press the spore syringe till a drop of spore solution comes out.
- Slowly move the needle upwards out of the jar, while pressing the sprayer. This allows the spores to spread across the edge of the substrate jar.
- Heat the needle red hot after every injection but wait till its cooled down sufficiently before injecting it again.
- Inject the jar on four places near the edge and possibly in the middle.
- 1 ml of spores solution per jar is sufficient (in case you used 240 ml jars)
- After inoculation, cover the substrate jar with foil.
- Repeat step 5 till 13 for all PF-Tek substrate jars.
- Write the datum of inoculation on the jar and also the type of spray used.
Incubation
[PF Tek instruction video part 4: http://dai.ly/x1yfu1i]
Now that the substrate jars are injected with spores you have to wait for the mycelium to colonise the entire jar. Put the jars away in a dark and draft-free place. Keep the temperature around 27 degrees Celsius. At a temperature below 15 degrees nothing will grow.
The entire colonisation of the PF-Tek substrate can take up to four weeks, depending on the conditions. After three to seven days you will see the first signs of the forming of the mycelium. You can recognize this by the white stains of threads that grow from the places where you injected the spores. When the entire content of the jar is white because of the mycelium it is best to wait one more week so that the inside of the substrate is fully colonised as well.
Check the substrate jars during the incubation period for contaminations. A contamination can be started by the different color of the growing mycelium. The mycelium is white, contaminations can be velvet, green, orange, black, bright yellow or gray. If you discover a contamination in a jar it is necessary to throw the substrate away immediately. Wash your hands thoroughly afterwards and disinfect the place and the direct environment of the jar. Take notes on which jar got contaminated, after how many days it was visible and how the contamination looks.
When the mycelium has colonized the entire PF-Tek substrate, the chance of contamination is very small. The mycelium, which is a living organism, will fight many contaminations by itself and tries to survive!
The cultivation
[PF Tek instruction video part 5: http://dai.ly/x1yfu2k](Necessary: Colonized substrate jars, fork/spoon, cover, cultivation bag, paper clip, plant sprayer, gloves, disinfectant solution, respirator, vermiculite and perlite are optional)
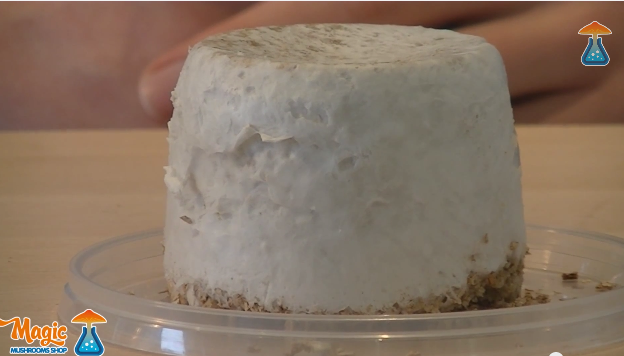
If the PF-Tek substrate has fully grown after four weeks and does not contain any contaminations it’s time for the last part of the PF-Tek method: preparing the substrate cakes for the growing of mushrooms. To grow mushrooms from the substrate you need to take the cakes out of the jar first.
- Open the cover of the PF-Tek substrate or remove the foil.
- Carefully remove the vermiculite on top of the PF-Tek cake using a sterile fork. You may find mycelium here, you can remove this together with the vermiculite.
- Take a cover or plate that’s a bit larger than the substrate jar and put it on the jar.
- Put the jar upside down and carefully tap the substrate loose.
- Let the substrate glide out of the jar and on to the cover or plate.
- Put your PF-Tek cake on the cover in the cultivation bag. Most likely there will be room for two cakes in one cultivation bag.
- Spray some water in the cultivation bag using the plant sprayer to get the humidity to the correct level.
- Repeat step 1 to 7 for all your PF-Tek cakes.
Best conditions for the mushroom grow
- Optimal cultivation temperature for your mushrooms is 24 degrees Celsius.
- Keep the humidity in the mushroom cultivation bag on 95%.
- Refresh the air in the bag before closing it again. A sufficient amount of oxygen and not too much carbon dioxide.
- A sufficient amount of light, but no direct sunlight.
After one to two or three weeks you will be able to harvest your own mushrooms from your homemade PF-Tek grow kit!
After the first flush
Harvest every mushroom. Even the smallest. After the first flush you will have to soak the substrate cakes again for the next flush. This way the substrate will have sufficient moisture for a new flush of mushrooms.
- Take a clean bucket or bowl with clean drinking water.
- Put your PF-Tek cake in the water and make sure it stays under water.
- Let the PF-Tek cake soak for twelve hours.
- Take the PF-Tek cake out of the water and put it back in the cultivation bag.
- You can harvest three to four flushes of mushrooms from the same PF-Tek cake.
- After each harvest, after removing the mushrooms, you can repeat step 1 to 5.
Dunk and Roll
Another method is to immediately soak the cake from the jar and roll it through vermiculite. There are mycologists who get better results this way. The vermiculite helps the moisture to dispose more gradually.
- Take a clean bucket with clean drinking water.
- Put your PF-Tek cakes in the water and make sure they stay under.
- Let the PF-Tek cake soak for twelve hours.
- Take a clean plate and sprinkle it with vermiculite.
- Take the PF-Tek cake out of the water and roll it through the vermiculite.
- Repeat steps 1 to 5 with each cake.
- Only roll the cake through vermiculite when preparing for the first flush. After the first flush soaking of the PF-Tek cake will be sufficient for the next flush of mushrooms. Rolling won’t be necessary then.
Tip: If you are using multiple PF-Tek jars you can experiment with both methods. Use the ‘Dunk and Roll’ method for half of your jars. This allows you to compare and find out which method works best for you.
Finally,
Hopefully the PF-Tek manual has helped you create a successful substrate that will give you several good flushes of mushrooms. If you have any questions or comments about the PF-Tek method or the magic mushroom cultivation manual feel free to contact us here: support{a}magic-mushrooms-shop.com
Have a nice grow!
Magic Mushrooms Shop
List of materials needed for PF-Tek growing
Substrate:
- Brown rice flour
- Vermiculite
- Water
Supplies:
- Jars
- Covers
- Aluminum foil
- pressure cooker or regular pan
- Grow bag
- Spore syringe, spore vial or spore print
- Syringe
- Alcohol burner or Torch-lighter
- Face Mask/Respirator
- Gloves
- Mixing bowl
- Scale
- Measuring cup
- Fork / spoon
- Awl, nail and hammer, drill
- Marker
- Tape or labels
Sources:
www.fanaticus.com www.shroomery.org www.erowid.com www.fungifun.org www.magic-mushrooms-shop.com
January 15, 2014